14. Animations#
The animation tool animates the load cases and increments of the loaded model. There are two animation types:

Transient — animates all increments of a load case.
Linear — animates from the initial state (0) to the final state of the selected increment, with the number of steps defined in the Frames setting.

Note
While the animation is running, the main NaxToView toolbar is locked.
14.1. Animation controls#
14.1.1. Timeline#
The animation timeline is located at the bottom of the animation bar.

14.1.2. Main controls#

The centre of the animation bar contains the following buttons:

Start Animation — begins the animation.

Pause Animation — pauses the animation.

Previous Increment — moves to the previous increment.

Next Increment — advances to the next increment.

Start of Animation — returns to the beginning of the animation.

End of Animation — moves to the end of the animation.
14.1.3. Editing options (right side of the bar)#
14.1.3.1. Transient animation options#
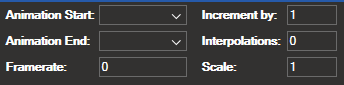
Animation Start — selects the increment where the animation starts.
Animation End — selects the increment where the animation ends.
Interpolations — calculates intermediate data between increments. For example, with 7 increments and 2 interpolations specified, the animation contains 21 increments in total.
Note
To apply a new interpolation value, pause the animation first.
14.1.3.2. Linear animation options#
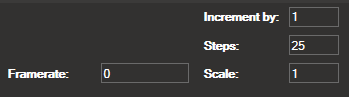
Frames — specifies the number of frames into which the animation is divided.
Note
The Linear option does not include Start of Animation and End of Animation buttons, as the linear range is already bounded by the Frames setting.
14.1.3.3. Common options#
Frames/Second — controls the number of frames the animation renders per second. A lower value produces a slower animation. Setting the value to 0 removes the frame-rate limit, allowing the animation to run at the maximum speed the hardware supports.
Increment By — specifies the increment between animation steps. For example, a value of 2 advances in steps of 2.
Scale Factor — defines the deformation scale of the model.
Note
To apply changes to Frames/Second, Increment By, or Scale Factor, pause the animation first.
14.1.4. Animation controls (left side of the bar)#
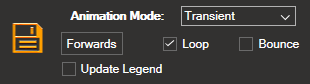
Loop — when enabled, the animation restarts from the beginning when it finishes.
Bounce — when enabled, the animation reverses direction when it reaches the end.
Note
Enabling Loop or Bounce automatically disables the other.
Forwards/Backwards — sets the playback direction: Forwards advances through increments; Backwards reverses through them.
Update Legend — when enabled, the legend shows the maximum and minimum values of each frame during the animation.
Save — saves the animation as a video file (
.aviformat).