

19. Card Manager#
Finite element solver input files (NASTRAN, OptiStruct) are composed of “cards.”
Card Manager, integrated into NaxToView, allows users to visualize, filter, edit, create, delete and export cards from .bdf, .dat, .inc, and similar files.
It includes validations based on the official NASTRAN/OptiStruct documentation to ensure correct edits, as well as a messaging system (success, warning, error) for each operation.
The Card Manager is organized into two tabs: Bulk Card Manager, which preserves the traditional deck-based workflow for operating on groups of cards at once, and Individual Card Manager, which lets you inspect and edit cards one by one, grouped by card type.
Note
In the current version, edits made to cards do not update the 3D view in real time. To see them there, write the changes with Overwrite Model — or export them — and load the file again in NaxToView. Status changes within the Card Manager itself — such as the colored indicators shown by the Individual Card Manager — are updated in real time.
19.1. Opening the Card Manager#
Load a NASTRAN/OptiStruct file in NaxToView.
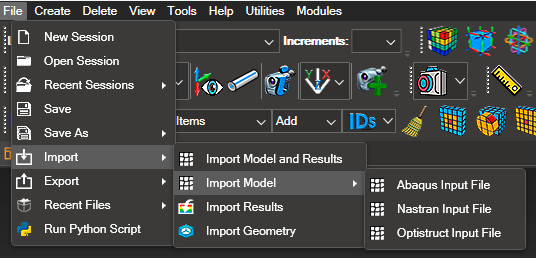
The Card Manager icon (
 ) appears in the toolbar.
Click the icon to open it. The Card Manager opens as a separate, resizable window, and it holds the focus while it is open: close it to go back to the 3D view.
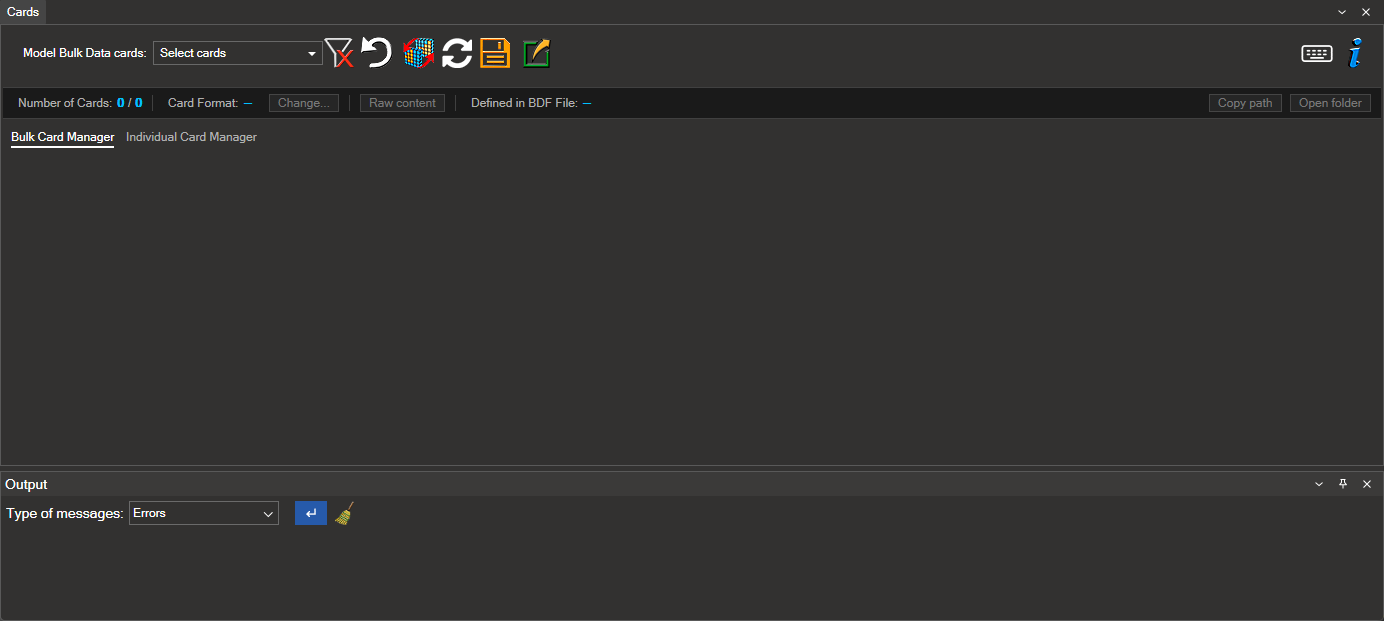
Other ways in
The toolbar icon opens the Card Manager on the whole model, or on the current 3D selection (see §19.3 Loading Cards). Two other tools open it already loaded with a particular set of cards, which saves selecting them again:
From the Includes Tree, Open Card Manager in the right-click menu loads every card of the include files selected in the tree. More than one file can be selected at a time.
From the Reference Tree of the Output Window, Open in Card Manager loads the single card of the entity you are looking at. If that card is not in the active model, NaxToView says so instead of opening an empty manager.
Opened either way, the Card Manager behaves exactly as described in this chapter.
19.2. Card Manager Interface and Tools Overview#
19.2.1. General Layout of the Card Manager Interface#
The interface is organized into:
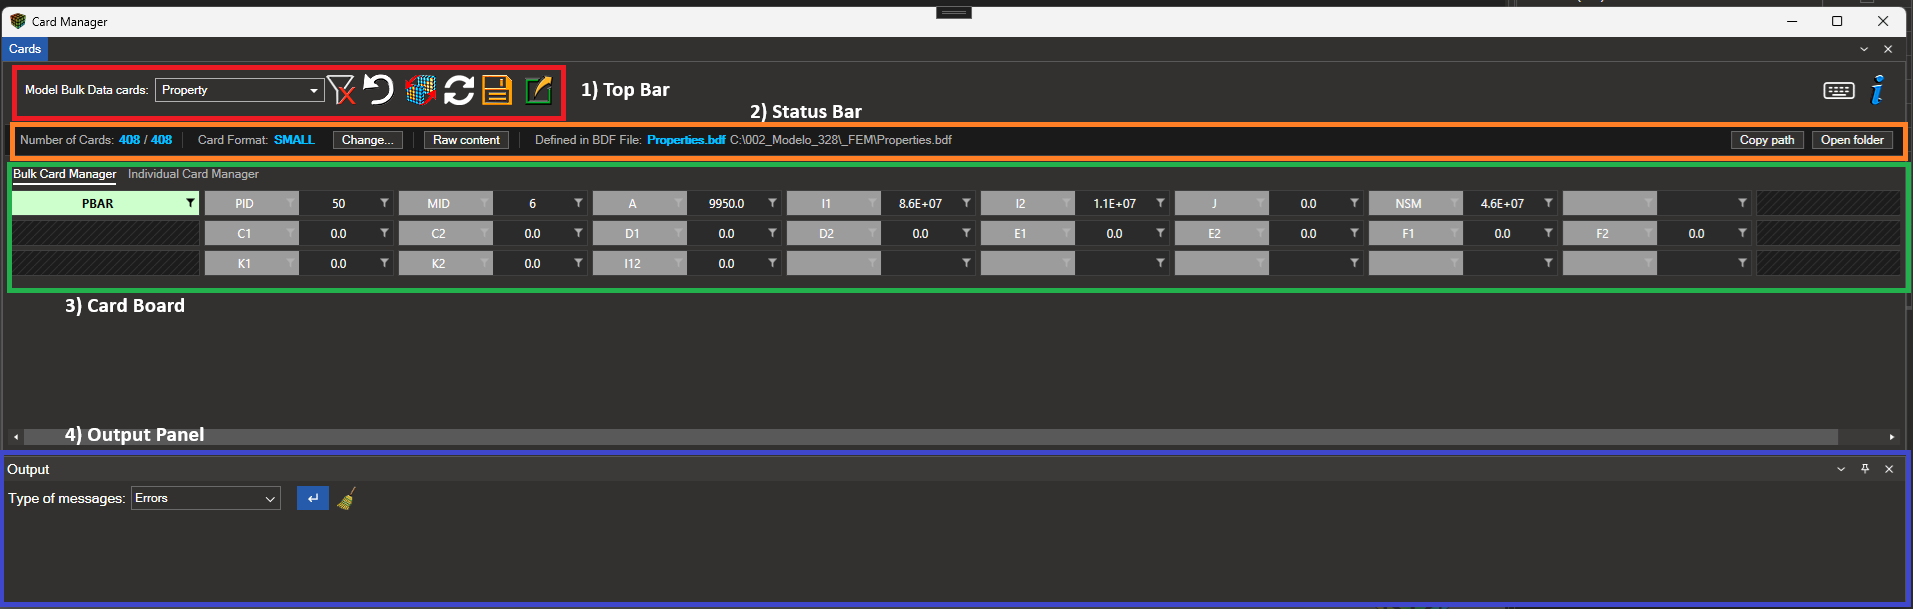
Top Panel (Cards)
Model Bulk Data cards: opens the card tree, where you choose which card types to load.
Delete Filters: clears every active column filter at once.
Undo Last Edit: undoes the last operation — an edit, a deletion or a restoration. The keyboard shortcut is
Ctrl+Z.Select Elements: selects in the 3D view what the filtered deck describes, as described in §19.6.6 Select Elements from Filtered Card Manager.
Revert All Modifications and Overwrite Model: see §19.9 Reverting Modifications and Overwriting the Model.
Export: opens the export menu, described in §19.10 Model Export.
On the right-hand side, the keyboard button lists the shortcuts available in the card board and the information button opens this guide.

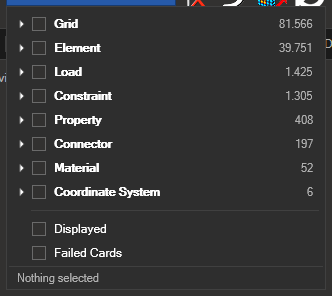
The tree groups the model’s card types by category, and adds the two special entries Displayed and Failed Cards. How to choose in it, and what each category holds, is described in §19.3.2 Manual loading (without selection).
Status Bar
Number of Cards x / y
x: Number of cards matching all applied filters (Filtered Card Manager list).
y: Total number of cards available under the selected categories (Card Manager list). The two figures match when no filter is applied; as soon as they differ, the first one changes colour, so a filtered deck is told from a complete one at a glance.
Card Format: field format of the open card, with a Change… button that rewrites it. In the Individual tab it applies to the open card; in Bulk, to every card of the deck.
Raw Content: shows the card exactly as it is written in the input file.
BDF File: the file the open card comes from. Copy path puts its full path on the clipboard, and Open folder opens the containing folder in the file explorer.

Bottom Panel (Output)
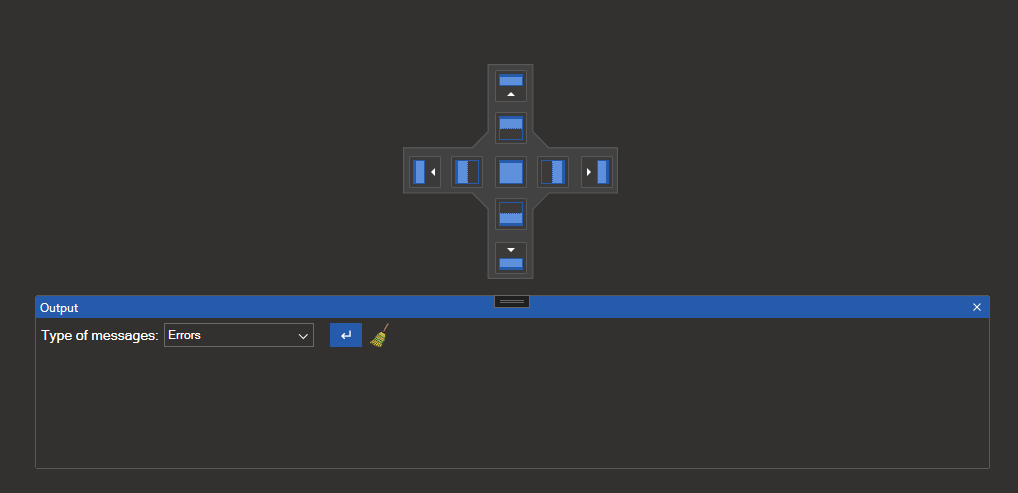
The Output panel acts as a message console that provides feedback about the operations performed by the Card Manager. It can be detached from the main window and placed anywhere on screen to improve visibility while you work. A broom icon ( ) next to the panel header clears its current content.
For details on the message types, their colour coding and how to filter them, see §19.8 Controlling Message Display (Output).
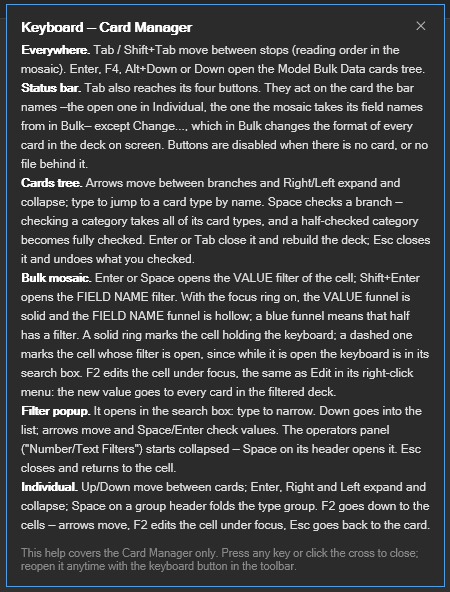
Keyboard shortcuts
A summary of the shortcuts available in the card board — moving between fields and cards, editing, copying and undoing — appears on its own the first time you press Tab, which is the key that starts moving through the board. It is shown once per NaxToView run, so reopening the Card Manager does not repeat it, and any key closes it: the key you press still does its job, so a Tab both dismisses the help and moves the focus on.
The keyboard button on the right of the toolbar opens the same summary at any time.
19.2.2. Working Modes: Bulk Card Manager and Individual Card Manager#
The Card Manager provides two working modes, accessible through tabs at the top of the window:
Bulk Card Manager — Preserves the traditional deck-based workflow. Cards are grouped together and a single Fixed Format Table is shown on screen, while the rest of the deck remains active in the background. Filters and positional edits apply to the whole deck simultaneously, which makes this mode efficient for mass operations on homogeneous sets of cards.

Individual Card Manager — Displays the loaded cards organized by type under collapsible headers (one header per card type, e.g.
GRID,MAT2,CQUAD4). Each card can be expanded individually to inspect or edit its own Fixed Format Table, and right-click menus allow the creation, deletion, and execution of methods on a per-card basis.

Both tabs share the same set of loaded cards: switching tabs does not reload the model and any change made in one mode is immediately reflected in the other.
19.3. Loading Cards#
The Card Manager offers two workflows for loading and viewing cards, depending on whether you want to work with a previously identified set of entities in the 3D window or explore cards globally by category.
19.3.1. Contextual loading (with a prior 3D selection)#
This method speeds up the editing of specific entities that you have already visually identified in NaxToView’s 3D window: open the Card Manager while a selection is active and the corresponding cards are loaded automatically.
Note
Connectors are picked in the 3D view like any element, so an element selection can bring
RBE2, RBE3 or RSPLINE cards with it. They are loaded under the Connector
category, not under Element: the two are separate in the card tree.
Workflow:
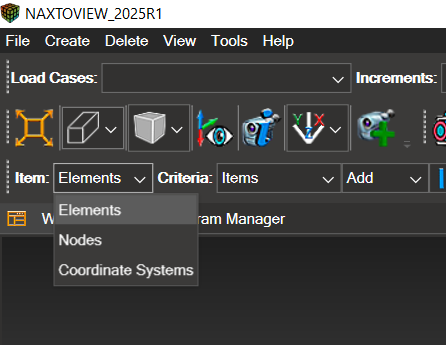
Select one or more entities in the 3D graphics window. Elements, nodes and coordinate systems are the three kinds of selection the Card Manager reads.
Click the Card Manager icon in the toolbar.
The Card Manager opens with the cards associated with the selected entities, ready for inspection or editing.
This approach is ideal for quick, precise modifications to a specific subset of the model.
19.3.2. Manual loading (without selection)#
Use this method when there is no active 3D selection or if you want to explore the entire model by categories.
Workflow:
Ensure there is no active selection.
Open the Card Manager (counter shows: Number of Cards: 0 / [Total]).
Open the card tree with Model Bulk Data cards and tick the categories or the individual card types you want, listed below.
Close the tree. The cards are loaded then, not as you tick, so a selection of several categories is loaded once instead of once per tick.
You can combine multiple categories (they are not mutually exclusive).
Ticking a category ticks every card type under it; a single type can also be ticked on its own.
The counter next to each entry gives the number of cards it holds, so the size of the load is known before making it.
Categories
Material: Physical material properties (e.g.,
MAT1,MAT2,MAT8).Property: Geometric/constitutive properties (e.g.,
PSHELL,PCOMP,PBAR,PSOLID).Load: Loads and boundary conditions (e.g.,
FORCE,MOMENT,LOAD).Constraint: Constraints and coupling equations (e.g.,
SPC,SPC1,MPC).Grid: Mesh nodes: ID and coordinates (
GRID).Element: Finite elements connecting nodes (e.g.,
CQUAD4,CTRIA3,CHEXA,CBAR,CELAS1).Connector: Special connectors/joints (e.g.,
RBE2,RBE3,RSPLINE).Coordinate System: Local coordinate systems (e.g.,
CORD1C,CORD2R).Set Definition: Sets of entities referenced by other cards (
SET,SET1,SET3).
Only the categories the model actually contains appear in the tree: one with no cards is not listed, so the tree of a given model is usually shorter than the list above.
Special Categories
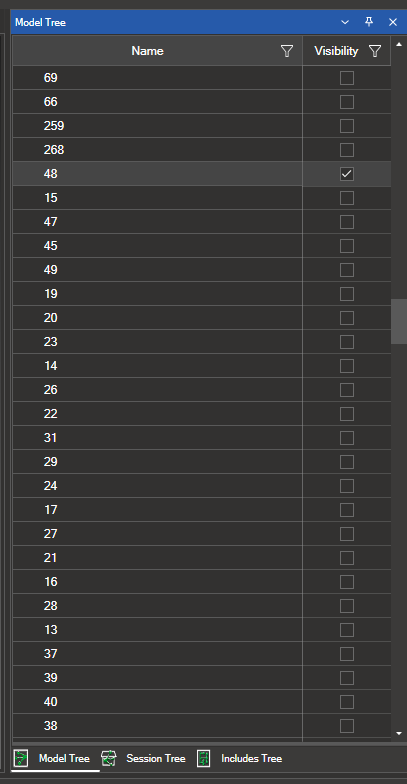
Displayed: Loads the cards that make up what is currently visible in the 3D view. See the notes below.
Examples:
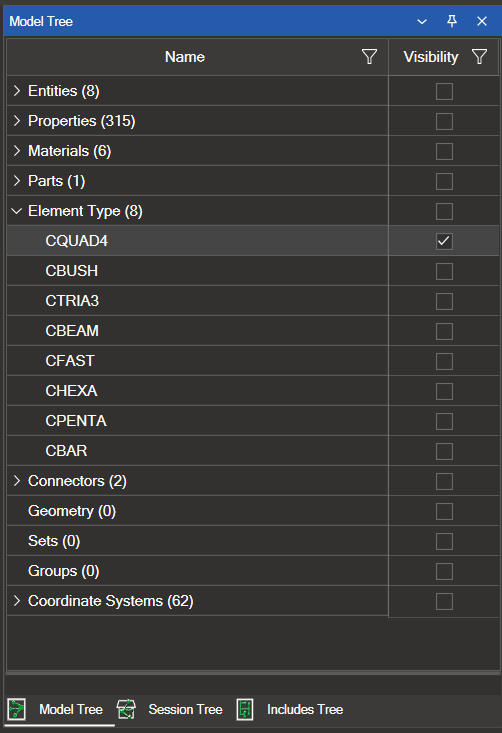
Isolating CQUAD4 in the Model Tree leaves only those elements on screen, so Displayed
loads only their cards:
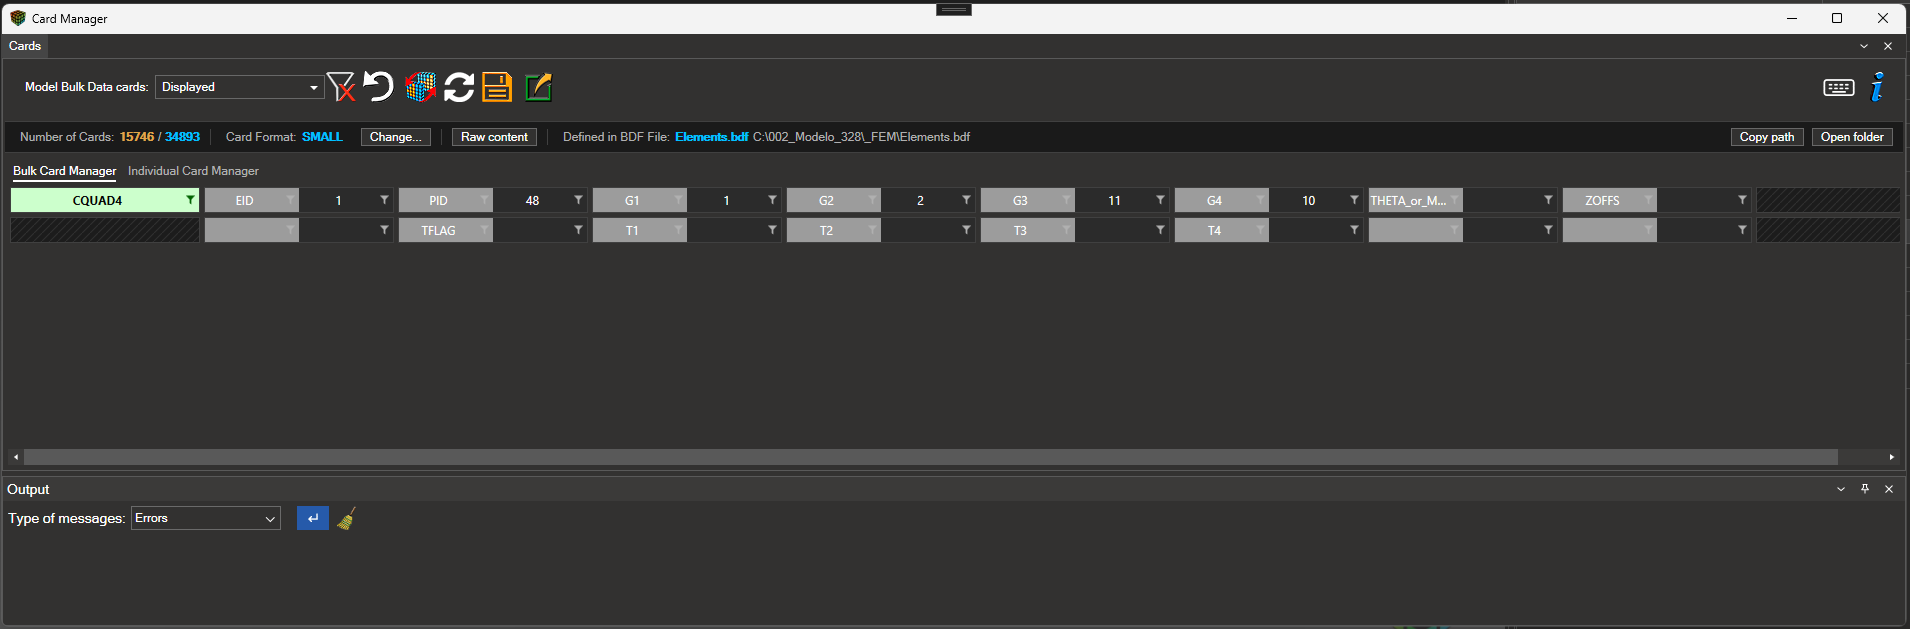
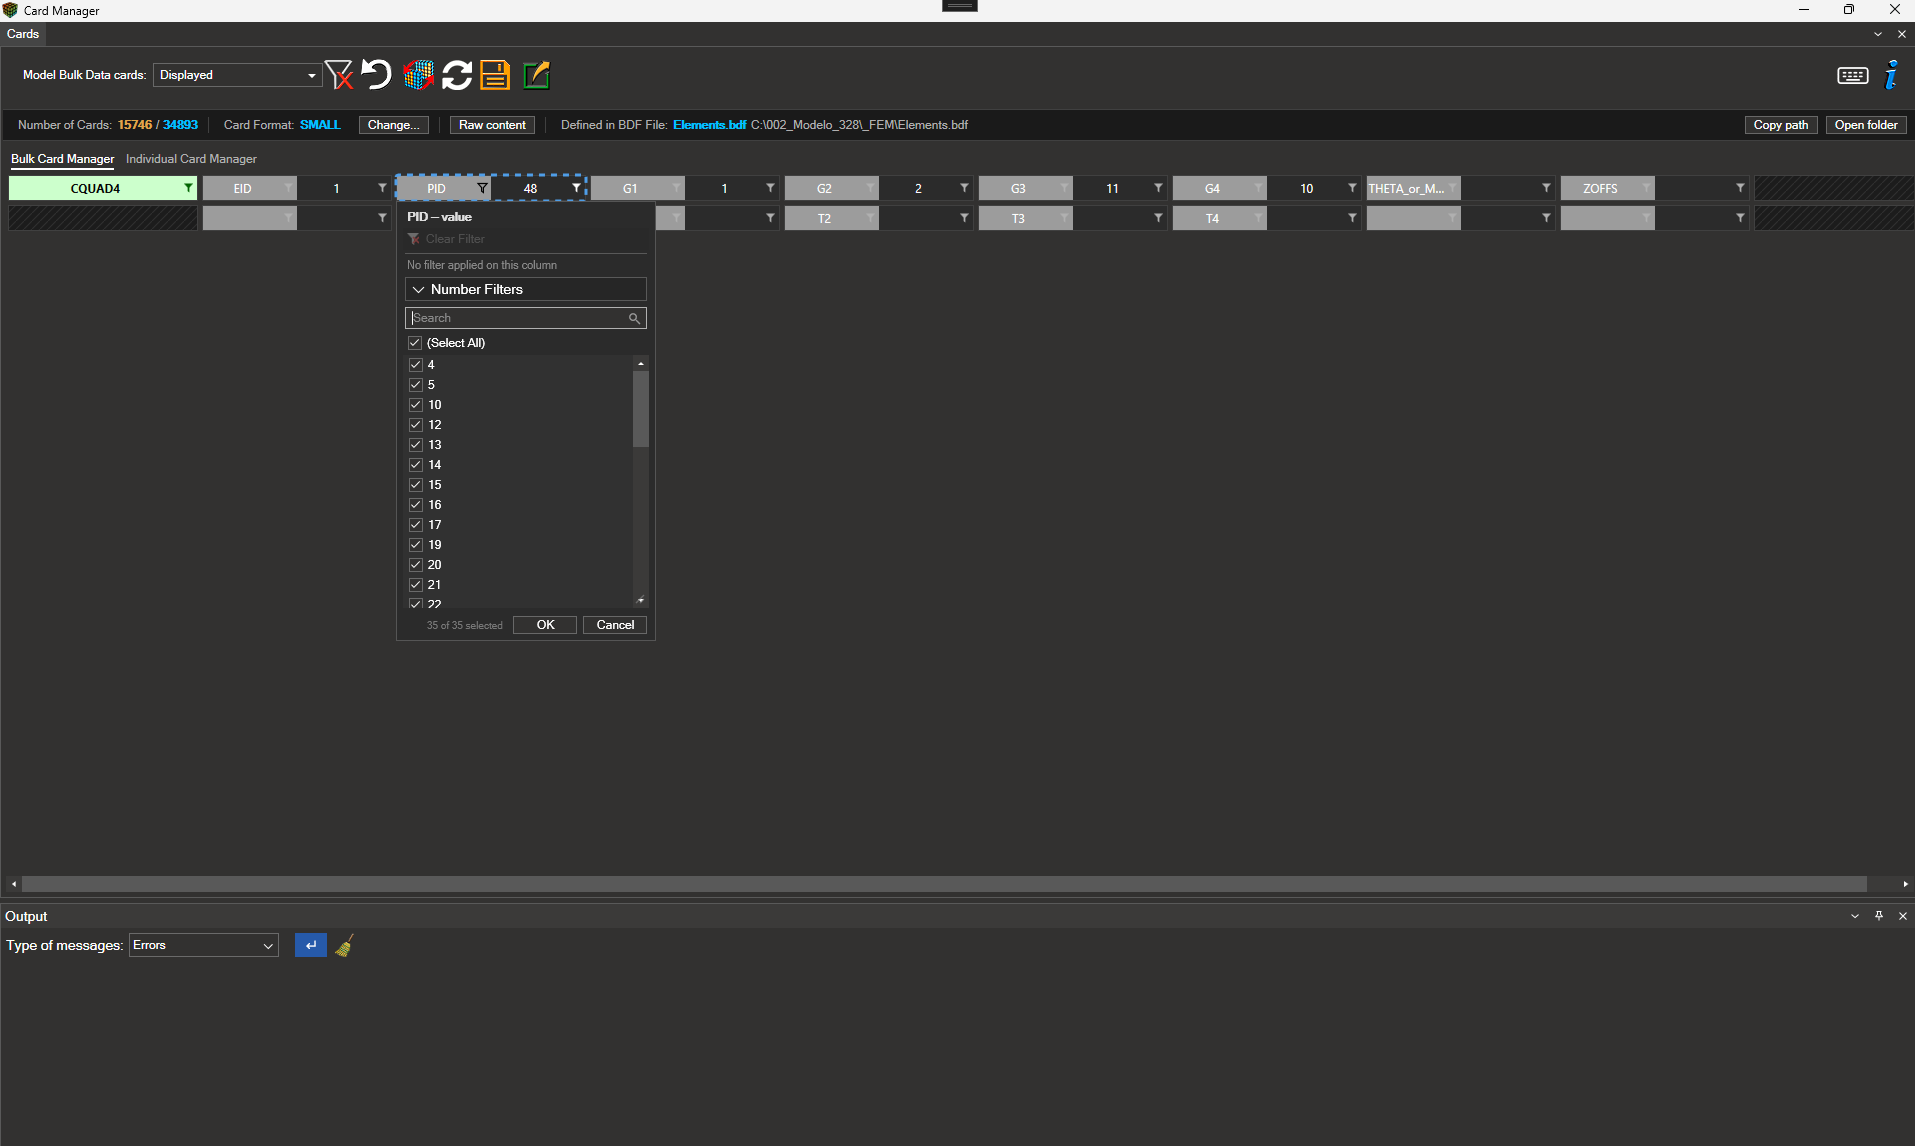
Showing only the elements with PID = 48 has the same effect:
Important notes on the Displayed category:
Displayed starts from the elements drawn in the 3D view and builds the mini-model around them: it walks down the references — the element’s property, the property’s material, the element’s nodes, the node’s coordinate system — and up to what acts on them — the loads and constraints applied. It follows the same reference graph as the Reference Tree, so the deck it loads is the complete description of what is on screen and not just its element cards.
An example: isolate one property in the Model Tree and open Displayed. The deck holds the
elements of that property, the PSHELL itself, the MAT it points at, the GRID cards of its
nodes and the loads and constraints applied to them — everything needed to read that part of
the model, and nothing from the rest of it.
Visibility is element-based: what is drawn decides the seed of the mini-model.
What Displayed loads therefore depends on the Model Tree filters (property, material, etc.).
Connectors count as elements and are also included.
It can be combined with the other entries, which narrow each other: Displayed together with Material loads the materials of what is on screen.
Failed Cards: Displays all cards with formatting or value errors, regardless of category, for quick diagnosis/correction. Based on the official Fixed Format Table (NASTRAN/OptiStruct). Invalid fields are marked with codes:
Integer:
-87Real:
3.402823E+38Text:
FIELD_MAPPING_ERROR
How to fix: Edit the marked fields and replace the codes with valid values, then write the change with Overwrite Model — or export the model — and load the file again. The corrected cards no longer appear under Failed Cards.
Important Notes on Card Selection and Visualization:
Any combination of entries can be ticked, the special ones included. Each ticked entry narrows the others: Displayed and Failed Cards together load the failed cards that are on screen.
The Bulk Card Manager tab draws a single card — the one with the largest number of rows — and keeps the rest of the deck loaded behind it: what is filtered or edited there applies to every loaded card. The Individual Card Manager tab lists the cards grouped by type, to open one on its own.
For a selection to be applied, close the card tree or click outside it. Only then does the Card Manager load the corresponding cards.
19.4. Graphical Representation of Information — Visual Structure of Cards#
The same NASTRAN/OptiStruct card can be written in Small, Large, Free, or FreeLarge formats. These formats only affect how the card is written; the fields and their values remain identical. To describe them uniformly, both solvers use the Fixed Format Table — a standard table that defines the position and meaning of each field.
19.4.1. Fixed Format Table#
The Fixed Format Table is a standard table used by both solvers that defines the position and meaning of each field:
Structure: 10 columns × as many rows as needed.
Independent of file format: applicable to Small/Large/Free/FreeLarge.
Purpose: common reading structure, easy comparison, and universal reference.
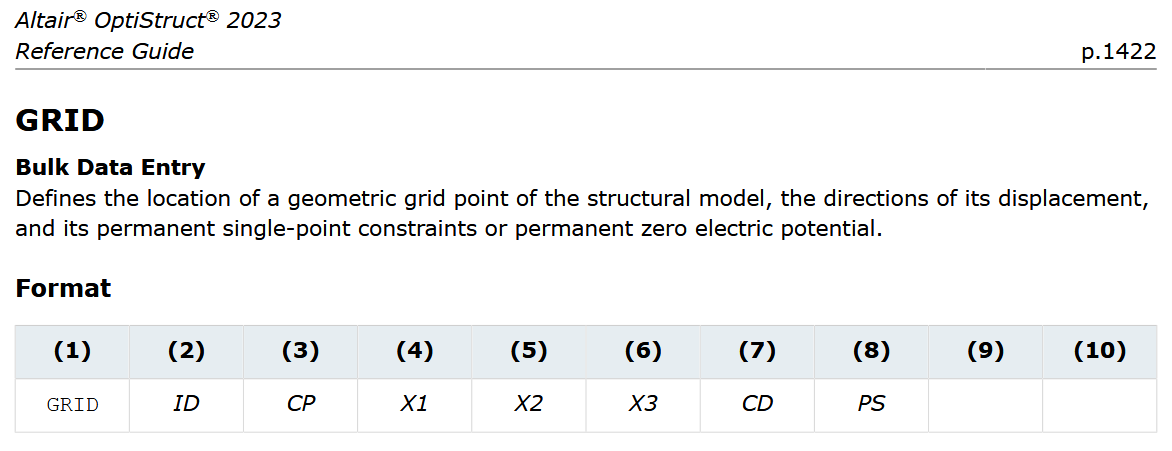
Below is an example of the Fixed Format Table for the GRID card according to NASTRAN and OptiStruct documentation, respectively:
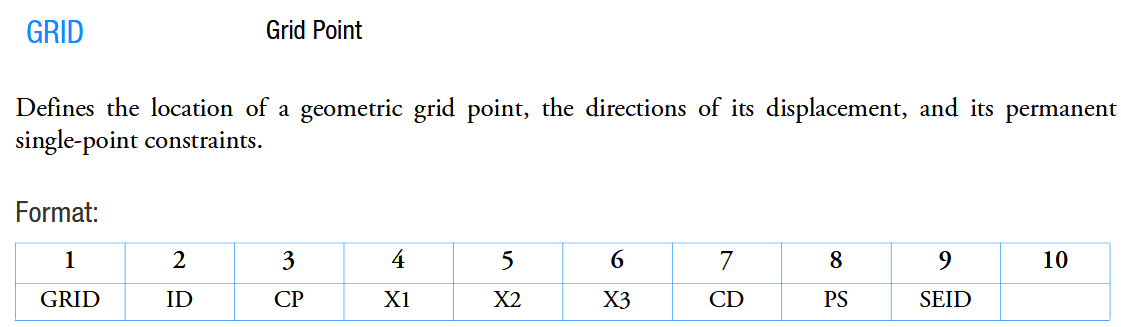
19.4.2. How the Card Manager uses it (Hybrid View)#
The Card Manager replicates the Fixed Format Table and merges the theoretical reference with the actual values from the file:
Left sub-cell (grey): Field label (e.g., EID, PID, G1, X1, CID).
Right sub-cell (black, white text): Editable real value from the model.

Header (green): Card type (
GRID,CROD,RBE2, etc.).

Result: you can see both the field name and its value without switching between manuals and plain text.
Note
Example. For a CROD card with documentation fields EID, PID, G1, G2 and file values 1001, 20, 15, 27, the Card Manager displays: EID / 1001 | PID / 20 | G1 / 15 | G2 / 27.
Advantages
Clarity and educational value: theory and real data in a single view.
Faster validation/correction: incorrect positions are easy to spot.
Consistency with NASTRAN/OptiStruct standards.
The figure below shows the hybrid Fixed Format Table approach for a GRID card:

Empty positions
Not every card fills its ten columns. The positions where the card has no field are drawn hatched and take no part: they have no funnel, no value and no context menu. They are there so that every card keeps the same ten-column frame, which is what makes two cards of different types comparable at a glance.
Navigation and Screen Space
Not all 10 columns always fit on the screen simultaneously.
Use the horizontal scroll bar (at the bottom) to navigate through columns and edit any field, even for large or multi-row cards.
19.5. Card Filtering in the Card Manager#
Note
The filtering workflow described in this section applies to the Bulk Card Manager tab, where the loaded cards are managed as a single deck.
Filtering allows you to work only with specific groups of cards. Remember that each card is displayed as a Fixed Format Table: each cell has two sub-cells, the left one the identifier given by the NASTRAN documentation and the right one the value read from the file.
19.5.1. Working Context#
Only one card (the one with the highest number of rows) is displayed on screen, but a whole deck of cards can be loaded behind it.
Check the status bar to see how many cards you are managing at any given time.

19.5.2. Filter Locations#
Each sub-cell — the field name on the left, its value on the right — has its own funnel, so a column can be filtered by either half.

Funnel states:
Blue: that half has a filter applied.

Grey: no filter applied.

White: the pointer is over that half. Useful in a dense card, where the two funnels of a cell are a few pixels apart.
Click a funnel to open its filter. With the keyboard, Enter or Space opens the value filter and Shift+Enter the field name one; while the cell holds the keyboard — the blue ring in the figure above — the two funnels change shape to say which key opens which: the value’s becomes solid and the field name’s a hollow outline.
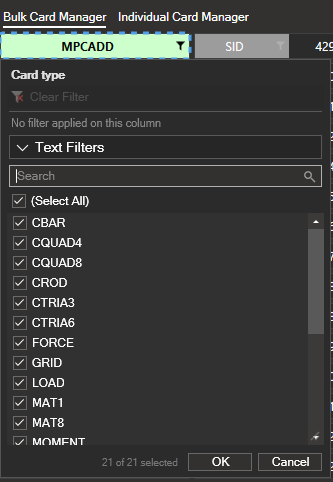
The card type cell
The green cell at the head of the card is the card type, and its funnel filters by type. On a deck holding several types it is the quickest way down to one of them.
Filtering by field name
The left half filters by the name of the field, which is what makes a mixed deck workable: a
position is WT1 in an RBE3, X3 in a GRID and FT in a PCOMP, so ticking X3 in the
field name funnel leaves the deck at the cards that have an X3 there. Every column is then
reclassified against what is left, which is why the operators panel of the next section can
change from one moment to the next.
19.5.3. The Filter Menu#
The menu is the same for every column; what changes is the panel of operators, explained in the next section.
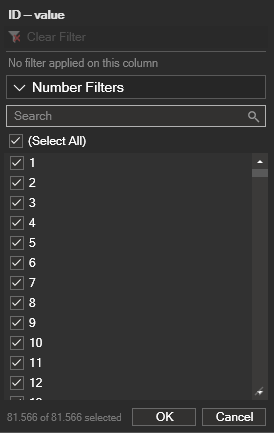
Header: names the half being filtered — ID — value, EID — field name — so there is no doubt about which funnel was opened.
Clear Filter: removes the criterion of that column. When there is nothing to clear it is greyed out and the line below it reads No filter applied on this column; otherwise that line states the criterion in force, in words.
Operators panel: starts collapsed. See §19.5.4 The Operators Panel.
Value list: every distinct value of the column, each with a checkbox, plus (Select All). The search box above narrows the list as you type.
Footer: counts the ticked values out of the total, so the reach of the filter is known before applying it.
Empty fields are listed as BLANK, which is also the word to type in the operators panel to match them.
When a column holds more than 1000 distinct values, the list shows the first 1000 and a last entry counting the rest. Those values are not left out of the filter: they are reached by typing the value in the operators panel.
19.5.4. The Operators Panel#
As the previous section showed, one position holds different fields depending on the card type, so the panel cannot be decided by the card: it is decided by what the column actually holds. Empty fields do not count towards the decision, and the title of the panel says which of the three cases applies.
Number Filters — every value in the column is a number.
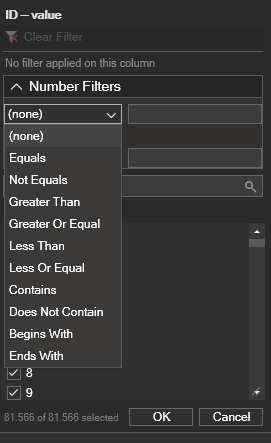
Values are compared as magnitudes, so 2 and 2.0 are the same value. All ten operators are
offered: Equals, Not Equals, Greater Than, Greater Or Equal, Less Than, Less Or
Equal, Contains, Does Not Contain, Begins With and Ends With. The first entry,
(none), is not an operator: it leaves that condition unused.
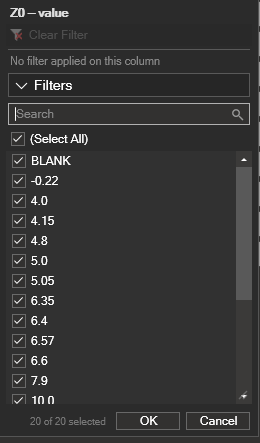
Filters — the column mixes numbers and text, as Z0 in a PCOMP does with its reals and
the literals TOP and BOTTOM.
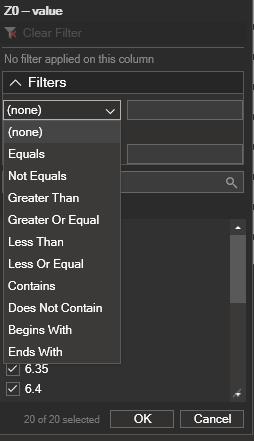
The same operators are offered, but values are compared as they are written, which is the only
way to keep TOP and 6.6 apart in one list.
How each operator compares. What the two panels above decide is equality: by magnitude under Number Filters, character by character under Filters. The rest of the operators do not change between them. The four ordering ones — Greater Than, Greater Or Equal, Less Than, Less Or Equal — always compare magnitudes, and the four partial ones — Contains, Does Not Contain, Begins With, Ends With — always compare the characters as the cell shows them.
That last point is worth remembering, because it is where a filter silently returns nothing:
Contains 1E+08 finds no card if the cell displays 100000000, even though both write the
same number. Type what you can read on screen. Matching part of a number is otherwise a
question worth asking — identifiers carry structure, so the PIDs containing 255 is a real
query — which is why these operators are offered on numeric columns at all.
Text Filters — no value in the column is a number.
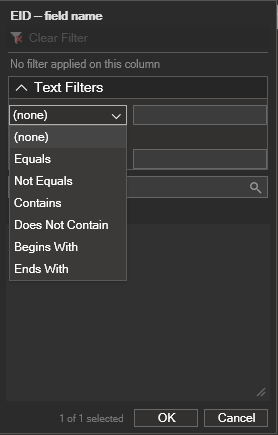
The four ordering operators are left out on purpose: they need a number on both sides, so in a column without a single number they could not match anything and would empty the deck with no explanation.
Two conditions
Every panel takes two conditions joined by AND — both must hold — or OR — either one is enough.
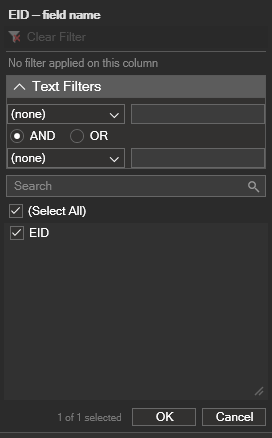
Example. To keep the cards whose PID is between 1000 and 2000:
First condition: Greater Or Equal, with the value 1000.
Operator: AND.
Second condition: Less Or Equal, with the value 2000.
19.5.5. Application and Feedback#
OK applies the filter; Cancel discards it.
The Number of Cards counter updates instantly with the result, and its first figure changes colour while the deck is filtered.
The funnel of that half turns blue, and the menu states the criterion in force in words — the only place where a criterion applied a while ago can be read back.
When no card matches
A filter that leaves the deck empty replaces the card board with a notice, rather than leaving the previous result on screen as if nothing had happened. The notice says how many filters are active, which of them emptied the deck, and offers the way out.
If the combination before the last filter did return cards, the way out is to undo just that last one, keeping the filters that were working:

If there is no earlier result to go back to — a single filter that matches nothing — the only way forward is to clear it and start over:

19.5.6. Filters in the Scripting Panel#
Every filter applied — and every one removed — is written to the Scripting panel, so the console keeps a trace of how the deck on screen was reached.
Each one leaves a comment line with the half being filtered, the criterion in words and the resulting deck:
# Card Manager: filter on PID (value) -> equals 4510 | 1,204 / 39,751 cards
The criterion says what was asked and the count what was obtained, which is the question you ask yourself when re-reading the log later.
When the criterion can be expressed as a single call, the equivalent command is written under it, ready to be re-run:
Cards.Filter("CQUAD4").Where(1, 3, "Equals", 4510)
Three cases have no command, and the panel writes only the comment line rather than a call that would do something else:
A criterion built by ticking values, because it carries as many values as the column’s domain — hundreds of thousands on a large model — and does not fit in one call.
A deck holding several card types, because
Cards.Filter()without a type covers the whole model while the manager’s deck is only the categories you ticked. The call would run, but over a different set.An operator the scripting API does not accept.
The Cards.Filter API is described in §20.6.2 Filtering.
19.5.7. Resetting Filters#
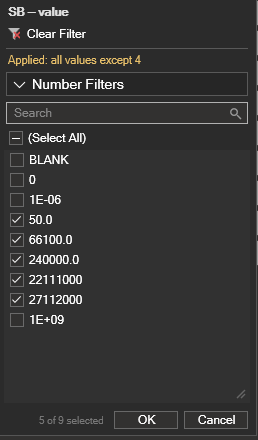
Individual: Click the blue funnel of that sub-cell → Clear Filter (only that column’s filter is cleared). The line under it reads the criterion in force — Applied: all values except 4 in the figure — so you know what you are about to remove.
Global: Click the funnel icon with an “X”, next to Category, to clear every filter at once and return to the state the deck had just after loading the category.

19.5.8. System Behavior (Static vs. Dynamic)#
When you apply a filter on a sub-cell:
The column you filtered ignores its own criterion: its list keeps showing the values it would show without it, with the ones that pass ticked and the rest unticked. Otherwise the values you had just removed would disappear from the list and could never be ticked back.
Every other column is narrowed: each one lists only the values of the cards that pass all the active filters.
Both lists are narrowed by the criteria of the other columns, so filters compose: the more you apply, the shorter every list becomes.
Example. You load CQUAD4 cards and filter EID between 1 and 10,000:
In
EID, the column you filtered, you still see the whole range of values, with the ones between 1 and 10,000 ticked.In
PID,MID,THETAand the rest, you only see the values belonging to the cards in thatEIDrange.
19.6. Editing Cards in the Card Manager#
Note
The editing workflow described in this section applies to the Bulk Card Manager tab, where positional edits propagate across the entire active deck. For per-card editing, see §19.7 Individual Card Manager.
Editing allows you to modify one or more fields of one or many cards simultaneously within the loaded set.
Key concept: one visible, many active
Only one card is displayed on screen — the one with the largest number of rows (its Fixed Format Table is the biggest).
However, a “deck” of active cards is loaded in the background and ready to be edited.
Use the status bar to check how many cards are currently being affected.
Positional editing
Changes are applied by position (row, column) in the Fixed Format Table to all active cards.
This means that the same position can represent different fields in different card types.
Caution
Example. Suppose two types of cards are loaded in the active set:
GRID, with the following Fixed Format Table: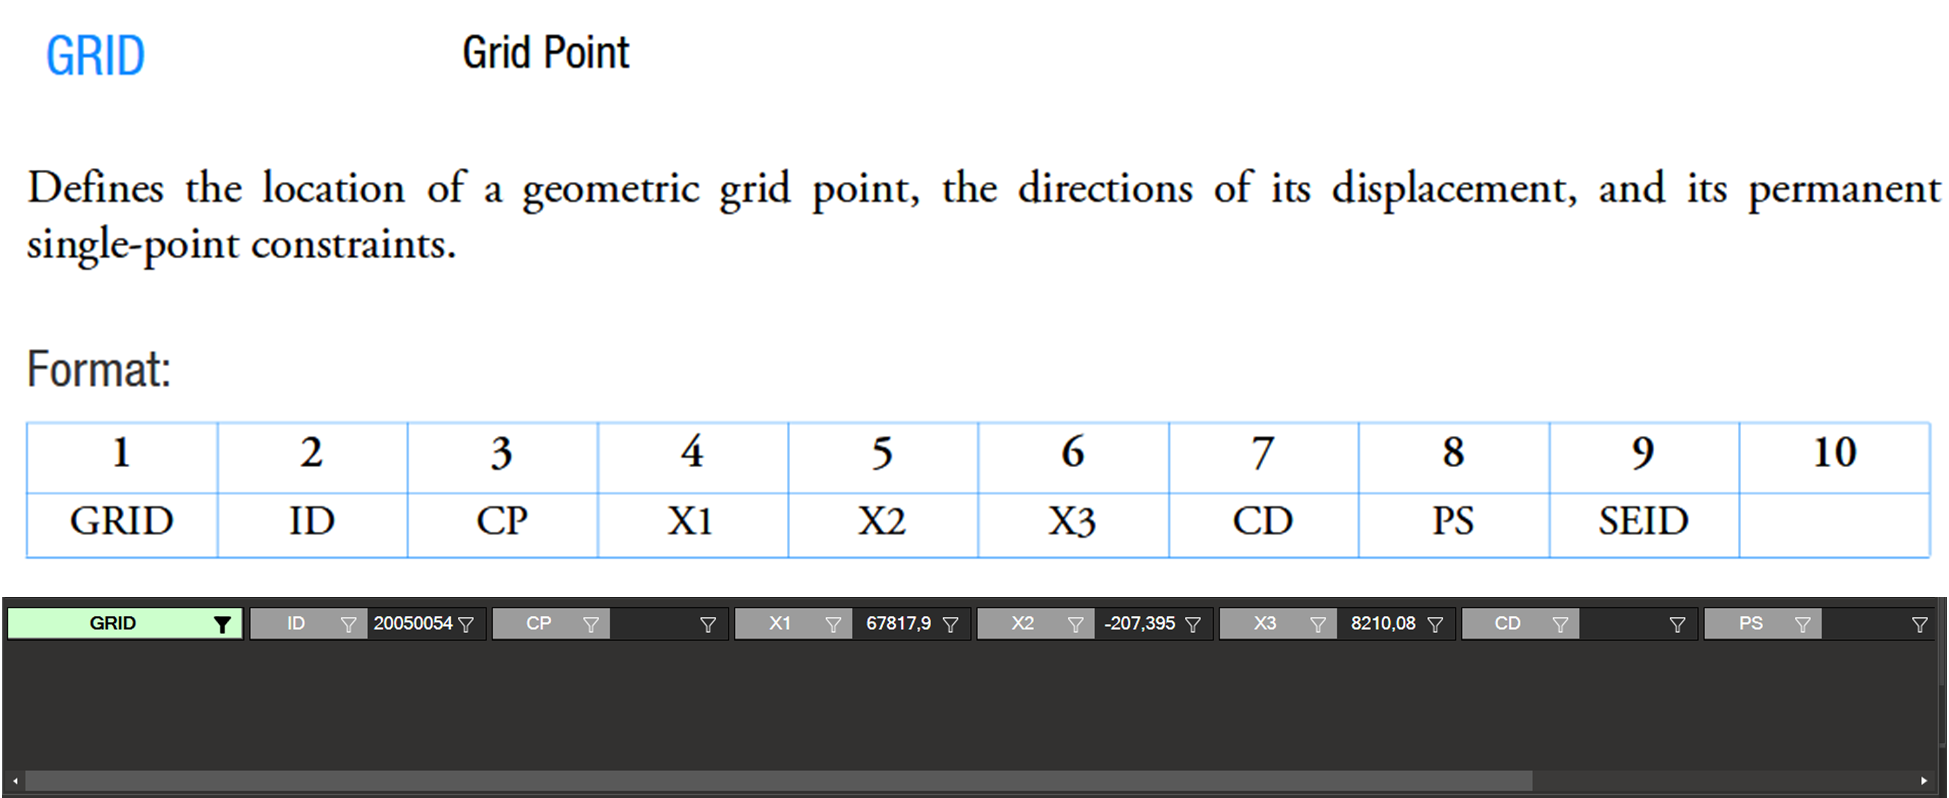
CQUAD4, with the following Fixed Format Table: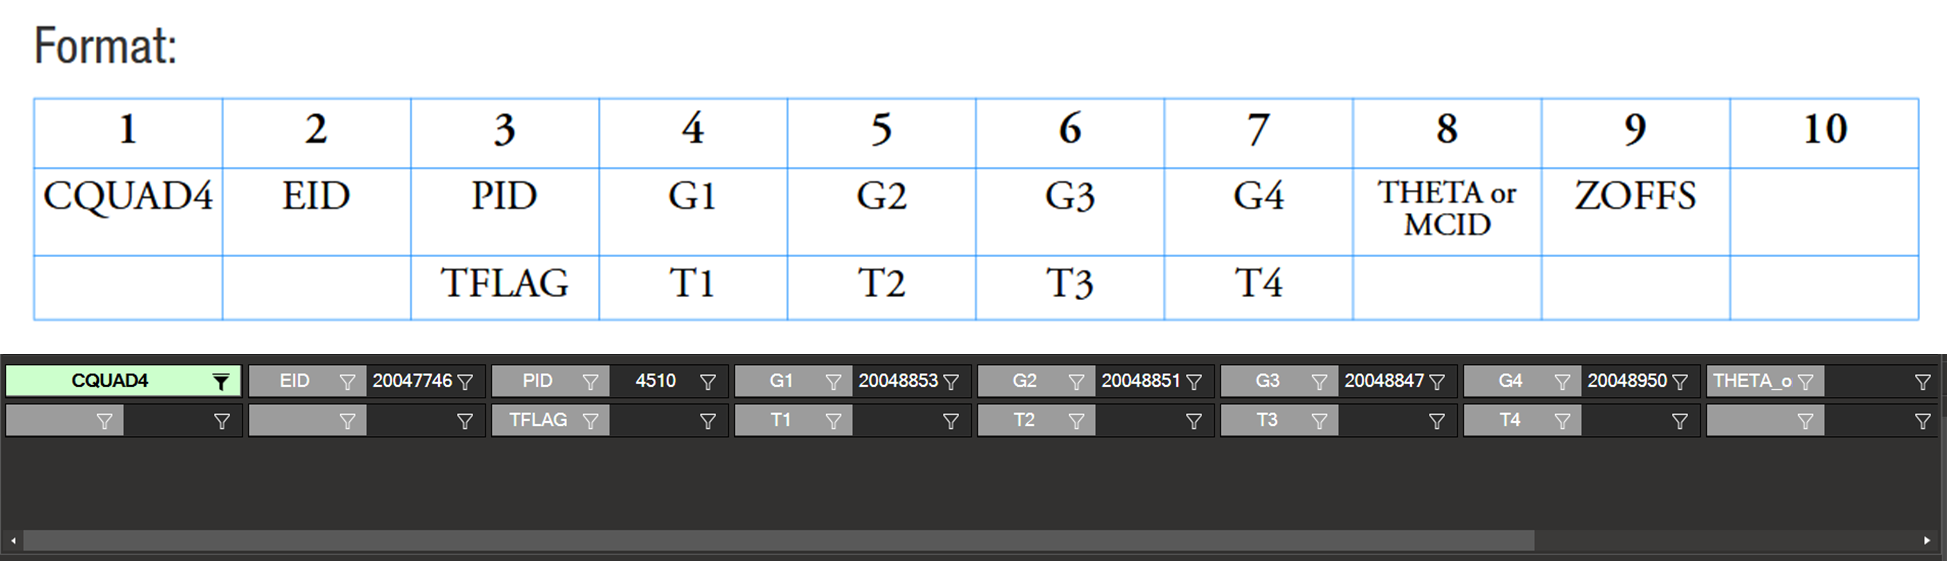
Because the CQUAD4 card has more rows, it is the one displayed on screen. This does not mean that the GRID cards are inactive — both types remain loaded in the working deck.
19.6.1. What Happens When a Field is Modified#
If you edit position (1,4) — which corresponds to field G1 in the CQUAD4 card — the Card Manager applies that same change to position (1,4) of all active cards, even if they belong to different types.
In this example:
In CQUAD4, position (1,4) is G1 (ID of the first node).
In GRID, position (1,4) is X1 (X-coordinate of the node).
Therefore, editing position (1,4) while viewing a CQUAD4 card also modifies the X1 field of all GRID cards in the active set, even though they are not visible on screen.
This behavior is intentional: it lets a single operation be applied efficiently and consistently to a group of cards. However, it also means you must be fully aware of which cards are included in the active set — especially when it consists of a heterogeneous group (multiple card types or categories).
19.6.2. Validation and Feedback#
Each field is validated according to official NASTRAN/OptiStruct rules before changes are accepted:
Success: valid change (displayed if this message level is enabled).
Warning: accepted but unusual or potentially inconsistent value.
Error: invalid value; the change is not applied.
All messages appear in the Output panel.
19.6.3. Best Practices Before Editing#
Check which cards are included in the active set.
Avoid positional edits on heterogeneous sets unless you fully understand the impact.
19.6.4. How to Edit a Field#
Right-click the value sub-cell you want to modify.
Select Edit.
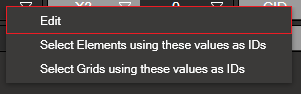
In the edit window, enter the new value and confirm.
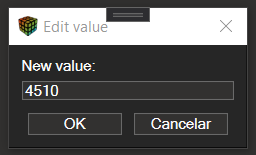
With the keyboard, F2 on the cell holding the focus opens the same dialog, with the same reach. On the green type cell it does nothing: that cell is not edited as text, and its menu offers the card type’s methods instead.
Accepted number formats
Both decimal separators are accepted — 3.25 and 3,25 are read as the same value — as are the
forms NASTRAN uses for reals:
Written |
Read as |
|---|---|
|
3.25 |
|
1.0×10⁹, 1.0×10⁻⁶ |
|
7.0 |
A value with no decimal point and no exponent is read as an integer, which is what identifier
fields require: 42.0 is not accepted where an integer is expected, as the NASTRAN
documentation states.
To empty a field, type BLANK.
Editing the whole deck
The value goes to every card in the filtered deck, not only to the one on screen. If the deck holds more than one card type, the Card Manager names the field, counts the cards, lists the types and asks for confirmation before writing. Answering anything but Yes cancels the edit and nothing is modified.
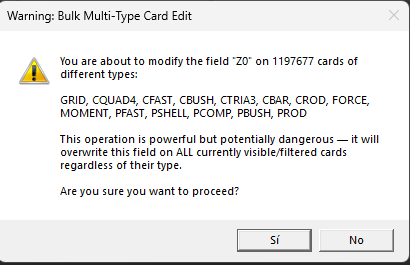
The warning matters because editing is positional: the same position is a different field in
each card type, as §19.6.1 shows with G1 in a CQUAD4 and X1 in a GRID.
Undoing changes
After making modifications to a field, you can undo the changes in two ways:
Keyboard shortcut: press
Ctrl+Zto undo the last modification.Undo button: click the undo button in the toolbar.

You can undo all modifications one by one, reversing each change in the order they were made. This allows you to step back through your editing history and revert any unwanted modifications.
19.6.5. Select Elements/Nodes Using Cell Values#
You can quickly select model entities (elements or grids/nodes) using the IDs shown in one or more selected cells of the table.
Steps:
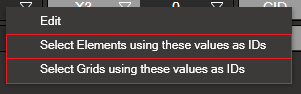
Right-click one cell to open the context menu.
Choose the desired action:
Select Elements using these values as IDs: selects all elements whose IDs match the values in the selected cell.
Select Grids using these values as IDs: selects all grids/nodes whose IDs match the values in the selected cell.
Notes:
All numeric values in the selection are used as IDs.
If a value does not correspond to any existing entity, it is ignored.
The current selection in the viewport updates immediately after the command.
The action follows the Add / Remove mode of the main toolbar, so it adds to what is already selected instead of replacing it — or removes from it, if that is the active mode.
19.6.6. Select Elements from Filtered Card Manager#
Click the Select Elements from Filtered Card Manager button in the toolbar to select, in the 3D viewport, all elements associated with the cards currently displayed in the Filtered Card Manager.

The action selects:
All elements whose cards are present in the Filtered Card Manager.
All connectors —
RBE2,RBE3and the like — whose cards are present.All elements referenced by property cards in the Filtered Card Manager. Filtering the deck down to a
PSHELLand pressing the button therefore lights up everything made of it.
Unlike the cell menu described above, this button replaces the current selection: it clears what was selected before making its own.
19.6.7. Apply a Method to All Cards in the Deck#
When the active deck contains cards of a single type, you can execute a card-specific method on every card in the deck in one step:
Make sure all cards loaded in the Bulk Card Manager belong to the same type. If the deck is heterogeneous, narrow it down first using the card tree and the column filters described in §19.5 Card Filtering.
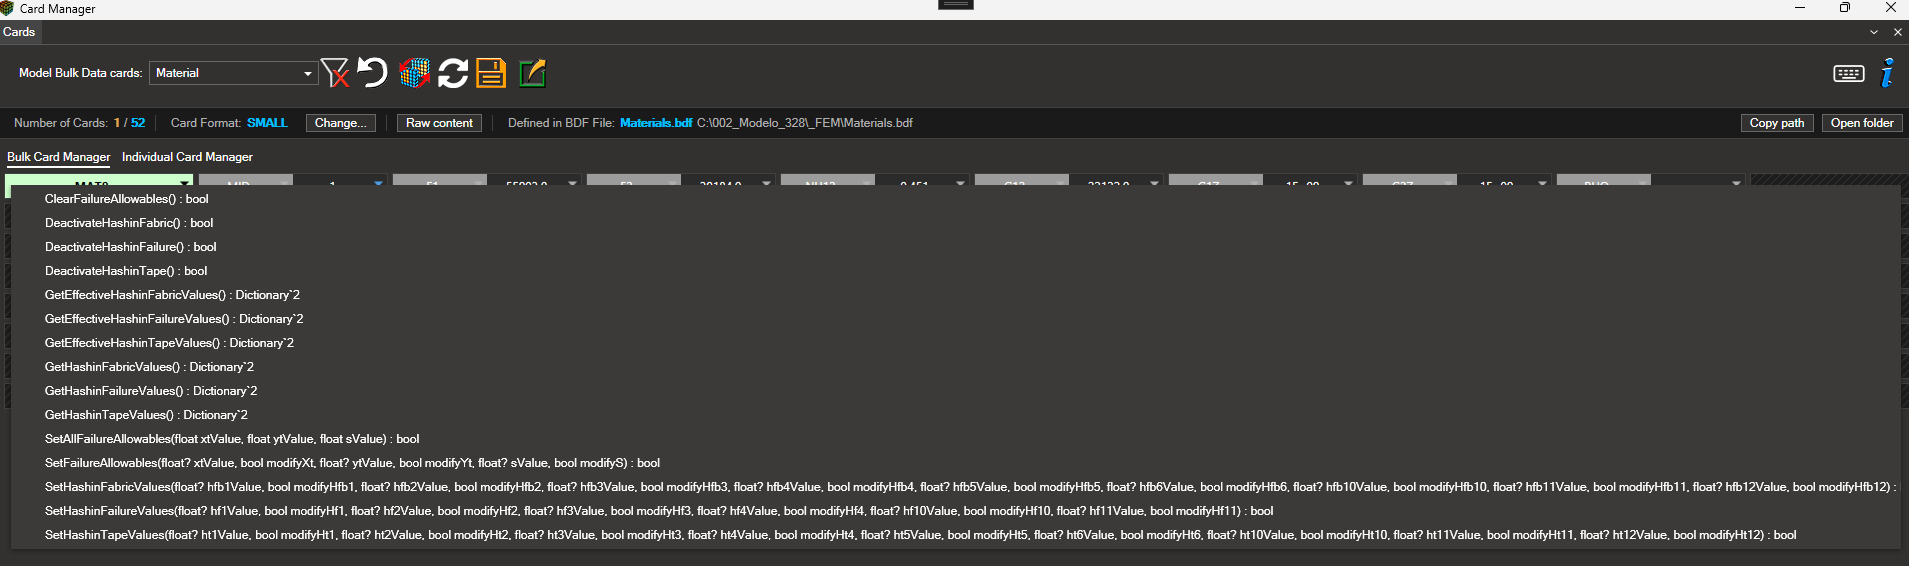
Right-click the green card type cell at the head of the displayed Fixed Format Table. It is the one cell that has no Edit entry, because it is not edited as text.
A context menu appears listing the methods available for that card type.
Select the desired method. The Card Manager applies it automatically to every card in the deck.
If the deck contains cards of more than one type, the context menu indicates that the deck must first be filtered down to a single card type before any bulk method can be executed.
19.6.8. What the Card Manager Records#
Every operation that changes the model writes the equivalent command to the Scripting panel and is stored in the session. Six of them are recorded:
Operation |
Line written |
|---|---|
Editing a field |
|
Undoing an edit |
|
Reverting everything |
|
Overwriting the model |
|
Running a card method |
|
Exporting |
|
This is what makes a saved session reproduce the work: reopening it replays those operations over the model, so the cards come back edited as you left them. It is also the shortest way to turn a session of manual work into a script — the lines can be copied from the console and re-run as they are.
Only the export is recorded without being replayed: reopening a session should not write files to disk without being asked.
When something cannot be replayed
An operation may fail to reapply — the card is no longer in the model, the value is rejected, the stored value cannot be read. When that happens the Scripting panel says so, with the count, the reasons and one line per failed operation:
WARNING: 3 of 412 card operations could not be reapplied while restoring the session
(2 with the card no longer present; 1 with the value rejected by the card).
The corresponding edits are NOT present in the restored model.
Read it as what it is: that much of your work did not make it back. A session that restores completely writes nothing, so silence here means everything was reapplied.
19.6.9. Changing the Field Format#
The Change… button of the status bar rewrites the field format of the cards. In the Individual tab it applies to the open card; in Bulk, to every card of the deck on screen.

Pressing it opens the dialog:
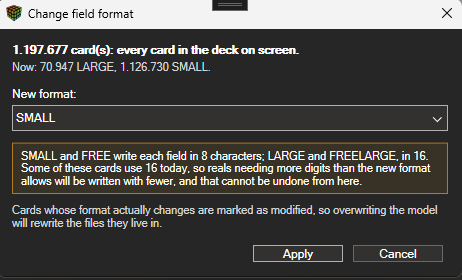
The dialog says how many cards it is about to rewrite and which formats they use today, then takes the new one.
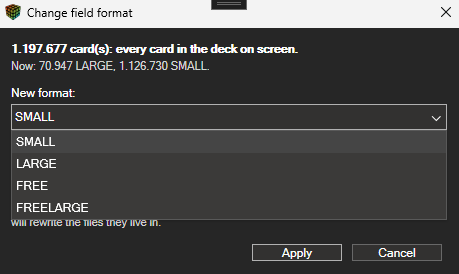
Two consequences are worth reading before applying:
SMALL and FREE write each field in 8 characters; LARGE and FREELARGE, in 16. Going from 16 to 8 writes reals needing more digits with fewer of them, and that cannot be undone from this dialog. The dialog raises this warning only when it applies — when the format you picked is one of the 8-character ones and some card in front of you writes 16 today. Note that FREE is an 8-character format despite separating fields with commas: the width of a field is not decided by the separator.
Cards whose format actually changes are marked as modified, so Overwrite Model will rewrite the files they live in.
19.6.10. Raw Content#
The window shows the card exactly as its file contains it, with the column ruler above so that each field can be counted, and the file and line it comes from.
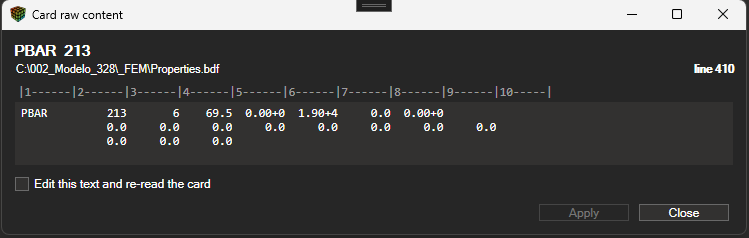
Ticking Edit this text and re-read the card turns the text into an editable box: Apply hands the edited text back to the reader, which parses it again as if it had just been read from the file. It is the way to repair a card whose layout is wrong — a field written in the wrong column — and not just one of its values.
Apply replaces the card, whether or not the result is valid. The reader offers no way to try the text without adopting it, so the window reports what happened instead of leaving you to guess:
Applied. The card was re-read and is valid. — in green: the new text parsed cleanly.
Applied, but the card is NOT valid: … — in red, with the reason. The card now holds that text, and the reason is what to correct next.
The window stays open in both cases, so a card can be corrected without reopening it, and the column ruler above the text follows what you applied. Unticking the box before applying discards what you typed and brings back the text the card currently has.
19.7. Individual Card Manager#
The Individual Card Manager tab provides a per-card view of the loaded set. Instead of the deck-based representation used in the Bulk tab, cards are organized under collapsible headers grouped by card type, and every card can be inspected and edited on its own.
19.7.2. Creating a New Card#
To create a new card of an existing type:
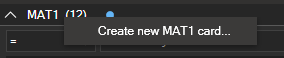
Right-click the header of the card type you want to add.
Select Create new <type> card… from the context menu.
Fill in the dialog and confirm. The new card is added under the corresponding header.
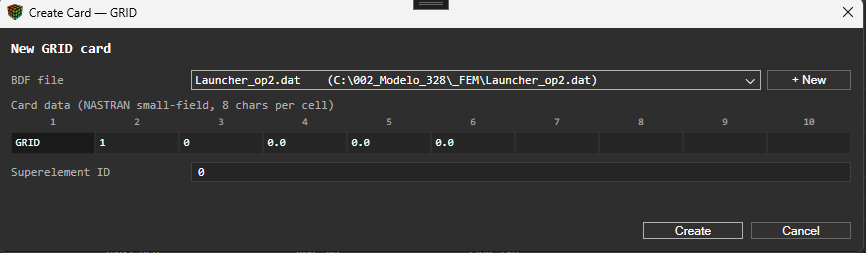
The dialog asks for three things:
BDF file: where the card will be written. + New creates an auxiliary file on the spot and points the new card at it, without leaving the dialog.
Card data: the values, typed into the same ten-column frame the card will have. The header says the format they are read in — NASTRAN small field, eight characters per cell.
Superelement ID: the superelement the card belongs to,
0for the main one.
Note
Not every card type can be created yet. On the ones the reader cannot build, the entry is still listed — so you know where to look — but disabled and marked (not supported).
19.7.3. Editing a Field#
Within an expanded card, double-click any value sub-cell of the Fixed Format Table to open the inline editor and modify its value — or reach the cell with the keyboard and press F2. Validation rules and feedback messages follow the same rules as in the Bulk Card Manager (see §19.6.2 Validation and Feedback), but changes are applied only to the card being edited — other cards of the same type are not affected.
After a field is modified, the corresponding card is flagged with the blue edited indicator described in §19.7.5 Status Indicators.
19.7.4. The Card Context Menu#
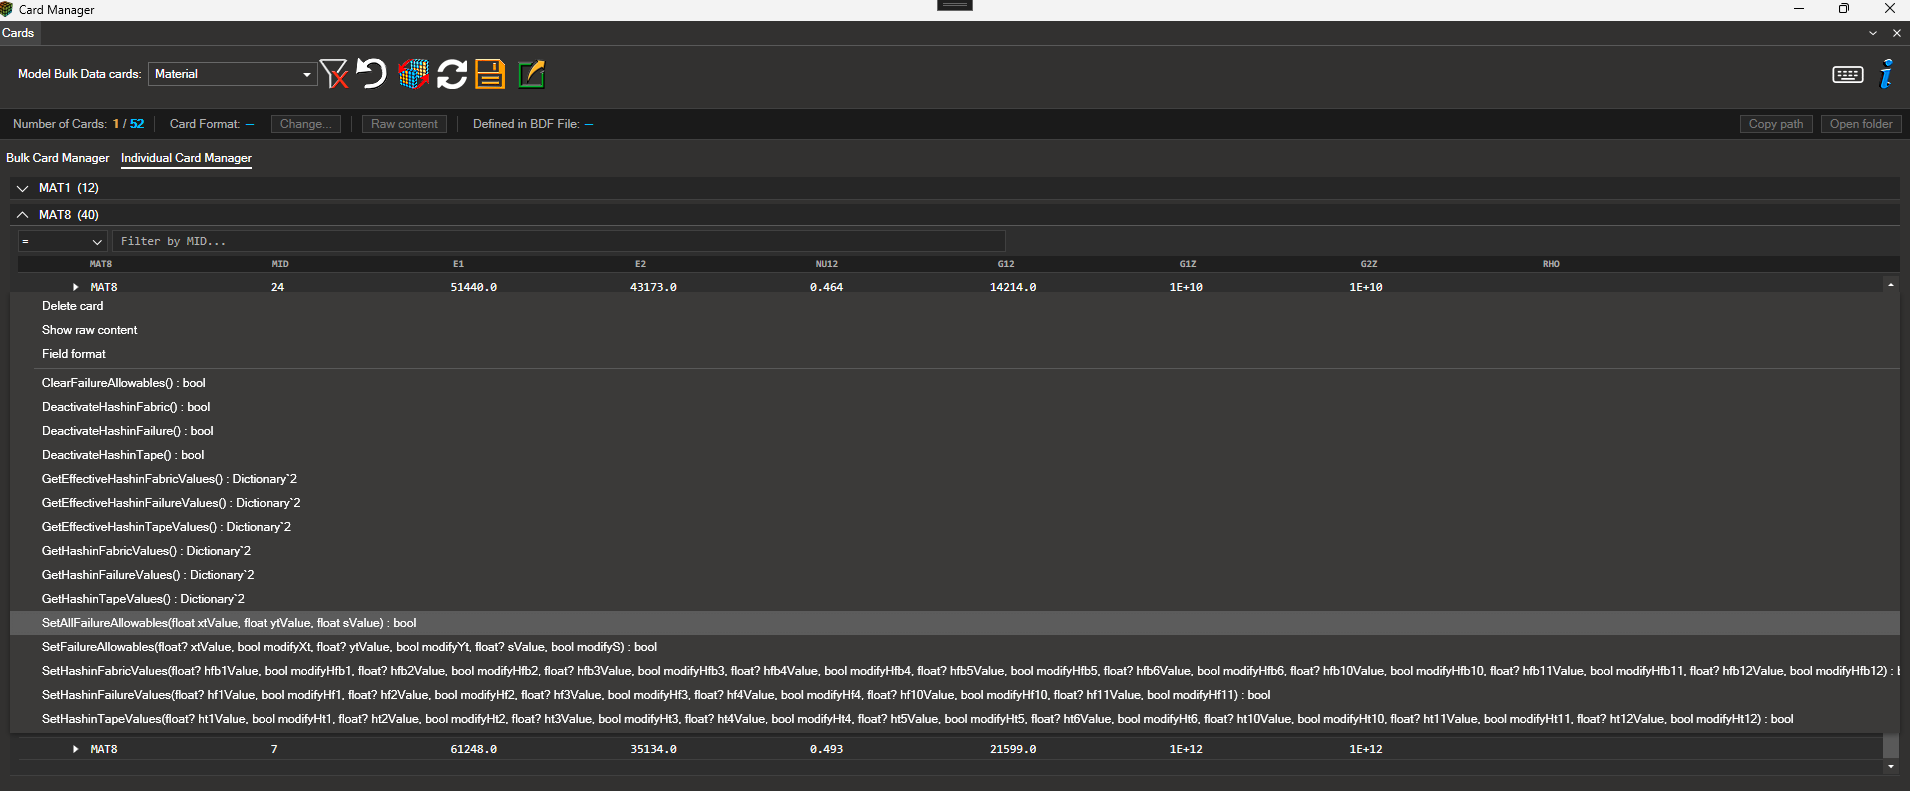
Right-clicking a card’s header opens the menu of what can be done to that card as a whole. Everything in it acts on that card alone, which is what separates this tab from the Bulk one:
Delete card marks the card as deleted, and the entry reads Restore card on a card that is already marked. Both go through the undo history, so
Ctrl+Zreverts either one, and neither touches the file until the model is written. The card stays in the list, dimmed, with the grey dot described in §19.7.5 Status Indicators.Show raw content opens the card exactly as its file writes it, with the column ruler above and the option to re-read it after editing — see §19.6.10 Raw Content. The entry lives here and not in the Bulk tab because in the mosaic a cell is a position across the whole deck, so “the text of this card” would have no subject; in this tab every row is a card.
Field format is a submenu with the four formats, the card’s current one ticked. It is the same operation as Change… in the status bar, described in §19.6.9 Changing the Field Format, applied to this card alone instead of to the whole deck.
Below a separator, the methods the card type itself offers, applied only to the selected card.
19.7.5. Status Indicators#
To make it easier to follow the state of every card while you work, the Individual Card Manager displays a colored dot next to each card:
Blue — the card has been edited with respect to its original values.

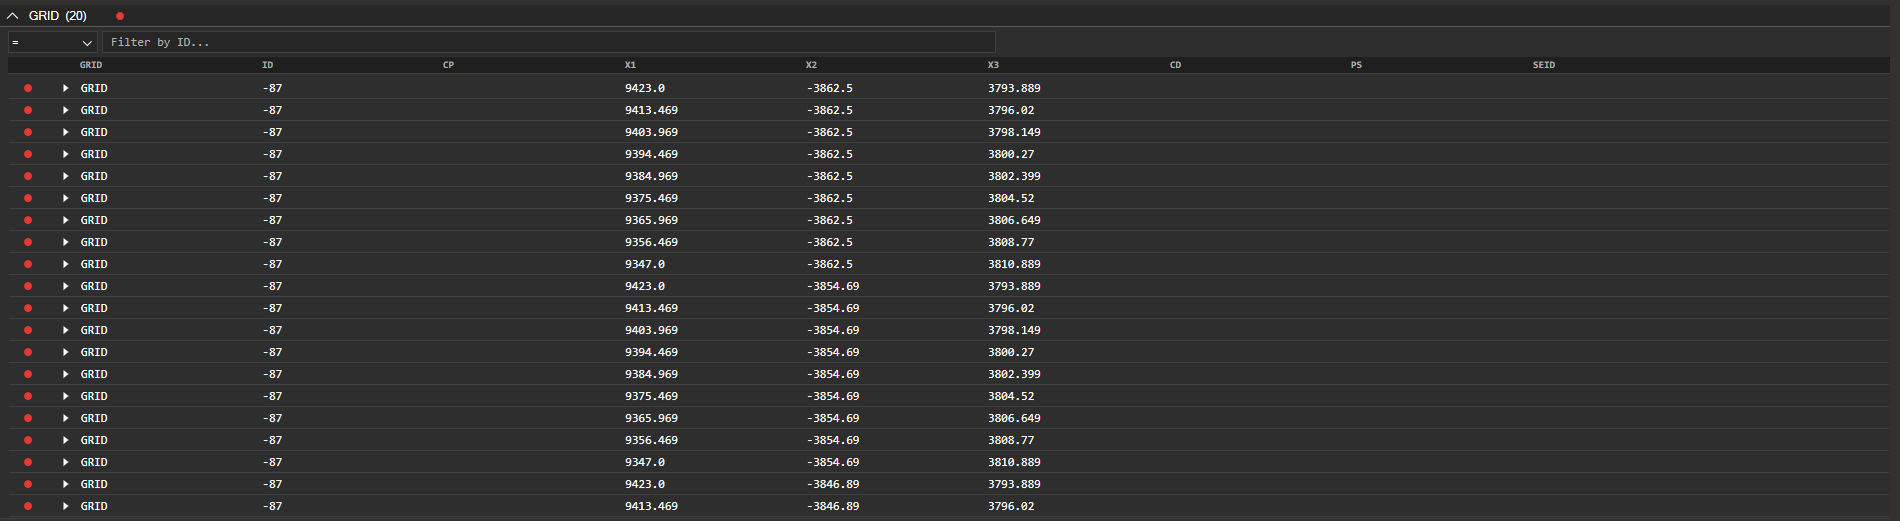
Red — the card contains an error: invalid values or formatting issues, the same cards the
Failed Cards entry gathers. The offending field carries one of the codes listed in
§19.3.2 Manual loading (without selection) — in the
figure, the -87 that every one of these GRID cards has in its ID.
Orange — the card has been created in the current session.

Grey — the card is marked for deletion, and its row is dimmed to say so.

The four dots always keep the same lane, in the order above, so the same state is always in the same place and a card can be read at a glance.
The header of a card type group carries three of them — modified, invalid and created — so a group can be told apart without expanding it: the red dot on GRID (20) above says that some of its twenty cards are invalid. Deletions are not summarised there; a deleted card is found by its own grey dot and its dimmed row.
These indicators update in real time as you work with the cards, providing an immediate visual summary of the changes made and the current state of every card. As noted in the introduction to this chapter, these status updates apply to the Card Manager view itself; the 3D model is only refreshed after writing the changes — with Overwrite Model or an export — and loading the file again.
19.8. Controlling Message Display (Output)#
The Card Manager Output panel acts as a feedback console: it shows in real time whether your actions completed successfully and whether any issues occurred.
19.8.1. Message Types and Colors#
Error (red): Operation could not be completed (e.g., invalid value).

Warning (yellow/orange): Operation executed with irregularity (e.g., negative density).

Success (white): Operation completed successfully.

19.8.2. Configuring Which Messages to Display#
You can enable or disable each message level independently or in combination.
Control this through the message level dropdown menu at the top of the panel.
With no level selected the selector reads Select types and the panel stays silent, so at least one has to be ticked for anything to be reported. Errors is the one enabled when the Card Manager opens.
The selector governs what is shown, not what is recorded: while the Card Manager is open everything the reader reports is kept, so ticking a level that was off displays the messages of the operations that follow.
Next to the selector there are two buttons. The word wrap button
( ) switches between fitting each message to the width
of the panel and showing it on a single line with a horizontal scrollbar — useful for long
reader messages, where the interesting part is at the end. The broom icon
() clears the panel.
) switches between fitting each message to the width
of the panel and showing it on a single line with a horizontal scrollbar — useful for long
reader messages, where the interesting part is at the end. The broom icon
() clears the panel.

19.8.3. How Many Messages Are Listed#
An operation over a large deck can report thousands of messages, and listing them all would bury the panel. At most 50 of each severity are written, followed by a line saying how many there were in total — Showing the first 50 of 2,317 errors found in this operation.
Some operations add a figure of their own that does not come from the reader’s messages but from re-reading the cards, and that one is exact: after a bulk edit, the number of cards that did not take the requested value.
19.8.4. Copying Messages#
Messages can be selected with the mouse — hold Shift for a range, Ctrl for individual lines — and copied with Ctrl+C. Ctrl+A selects every message in the panel. Both actions are also available from the right-click menu. The unit copied is the whole message, so a set of lines can be pasted into a report or an e-mail as it reads on screen.
19.9. Reverting Modifications and Overwriting the Model#
In addition to filtering, editing, and exporting, the Card Manager toolbar provides two global actions that operate over the whole loaded set of cards regardless of the active tab: Revert All Modifications and Overwrite Model.
19.9.1. Revert All Modifications#
The Revert All Modifications button ( ) discards every change made during the current Card Manager session and returns the loaded files to the state they had when they were originally opened. Specifically, this action:
Restores all edited field values to their original values.
Restores every card that has been deleted during the session.
Removes every card that has been created during the session.
Clears the status indicators those three states had set — modified, deleted and created.
The red invalid dot is not one of them: a card marked red was already invalid in the input file, so returning it to its original state leaves it exactly as invalid as it was. Only an edit that fixes the offending field clears that one.
The operation is global and affects both the Bulk Card Manager and the Individual Card Manager simultaneously.
It empties the Card Manager. With the model back at its original state, the card tree is unticked and the deck is cleared, leaving the window as it looked the first time you opened it. Tick the categories again to carry on working — the cards are loaded from the files, now with no modification pending.
It does not act without asking. Before touching anything it lists what it is about to do — how many cards will be reverted, how many restored and how many removed — and waits for confirmation; answering anything but Yes leaves the model untouched. If there is nothing to revert it says so instead — There are no modified, deleted, or user-created cards to revert — and does nothing. When it finishes, the Output panel reports what was actually done, and says so too when some of it failed.
Tip
Use Revert All Modifications when you want to discard the full editing history in a single step. For a step-by-step undo, use Ctrl+Z or the Undo button described in §19.6.4 How to Edit a Field.
19.9.2. Overwrite Model#
The Overwrite Model button ( ) writes the current modifications back onto the original input files on disk. The Card Manager automatically detects which
 .bdf, .dat, or .inc files contain changes and overwrites only those files; files without modifications are left untouched.
This action is different from Export (see §19.10 Model Export):
Export generates a new input file in a folder you choose, without altering the original files.
Overwrite Model updates the original input files in place, replacing them with the modified versions detected by the Card Manager.
Like Revert All Modifications, it asks before writing: the dialog names what is at stake and states that the action cannot be undone. If there is nothing to write, it says so instead — There are no modifications to save — and does nothing.
When it finishes, the Output panel carries the verdict the reader gave, not merely the absence of a complaint. If the reader reported a problem while writing, the message says so and the files that failed are named.
Note
The report of a successful overwrite is a Success message. If Success is not ticked in Type of messages, the panel says only that the model was overwritten, and points at the setting: enable it to read the details.
Warning
Overwriting is a destructive operation on the original files. Make sure you have a backup or a version-controlled copy if you may need to recover the unmodified state later.
19.10. Model Export#
Exporting generates NASTRAN or OptiStruct input files (.bdf, .dat, .fem) from the model
currently loaded, including any edits made in the Card Manager.
NaxToView offers two export routes. They produce the same kind of output and are configured almost identically; what changes is which cards each one starts from.
Card Manager export — the Export entry of the Card Manager toolbar. Starts from the cards loaded in the Card Manager, so it is the route to use once you have selected and filtered what you want. Its options open as a menu.
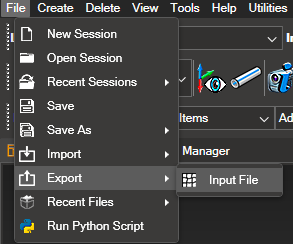
General export — File → Export → Input File in the main menu. Starts from the whole model, or from the entities currently displayed in the 3D view, without opening the Card Manager at all. Its options open in a window.
19.10.1. Which Options Appear#
The first choice, Export as, decides the rest: each mode reveals the rows that apply to it and hides the ones that do not. So the panel never offers a setting that would be ignored, and what you see is exactly what the export will use.
Row |
Model |
Individual Cards |
Single BDF File |
|---|---|---|---|
Export as |
✓ |
✓ |
✓ |
File Structure |
✓ |
— |
— |
BDF File |
— |
— |
✓ |
Dependencies |
— |
— |
✓ |
Card Types |
— |
✓ (general route only) |
— |
Options |
✓ |
— |
✓ |
Card List |
✓ |
✓ |
— |
Card Format |
✓ |
✓ |
✓ |
Two rows behave differently depending on the route: Card List offers different entries, and Card Types exists only in the general route. Both are explained below.
19.10.2. The Options, One by One#
Export as — the kind of output produced.
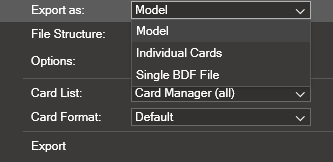
Model: rebuilds the model as a runnable deck, either consolidated into one file or keeping its original file tree.
Individual Cards: dumps the selected cards to a single raw
.bdf, with no model context — no executive or case control, noINCLUDEdirectives. Use it to hand over just the cards you edited.Single BDF File: exports one complete file of the model, as it is.
File Structure (Model only) — how the output is laid out on disk.
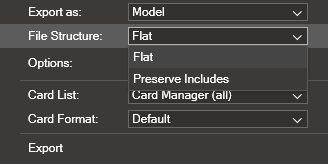
Flat: everything merged into a single file, with every
INCLUDEexpanded inline.Preserve Includes: keeps the original file tree, writing each
INCLUDEfile separately.
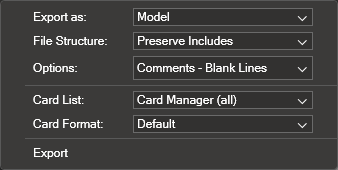
Switching to Preserve Includes also shortens the Options row, as the next figure shows, for the reason given under Options below.
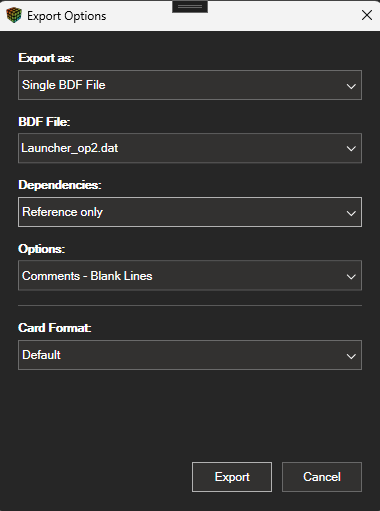
BDF File and Dependencies (Single BDF File only) — which file to export, and what to
do with the INCLUDE directives it contains.
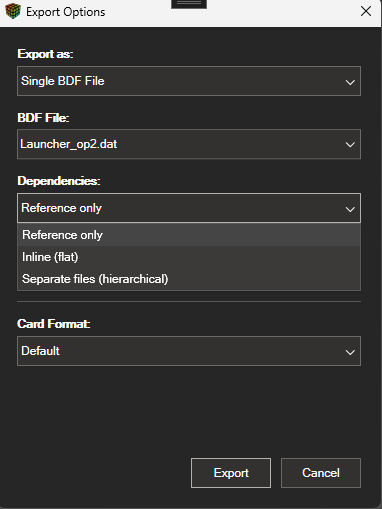
Reference only: keeps the
INCLUDEline as it is and exports just that one file. The result is not self-contained.Inline (flat): expands every
INCLUDEinto a single consolidated file.Separate files (hierarchical): also exports the linked files, preserving their folders and relative paths.
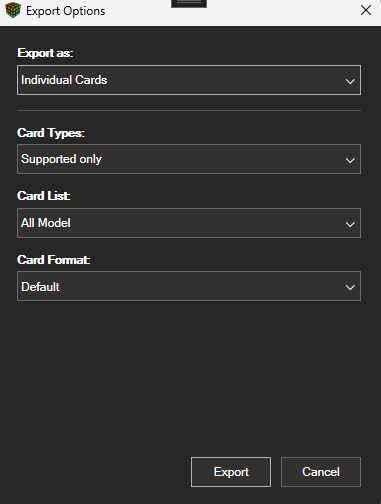
Card Types (Individual Cards, general route only) — how much the dump covers.
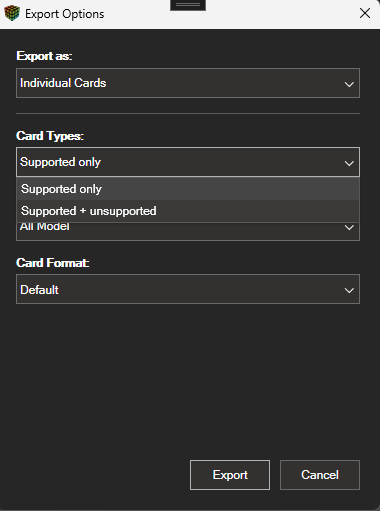
Supported only: just the cards the reader recognizes.
Supported + unsupported: also the Bulk Data entries whose card type is not supported yet, written exactly as they appear in the model.
Unsupported entries never reach the Card Manager grid — they cannot be selected in the 3D view either — which is why this row exists only in the general route. It is also the reason that option always exports the whole model.
Options — non-card content to keep. The list depends on the file structure, because two of the four only make sense in a consolidated file.
Flat offers four:
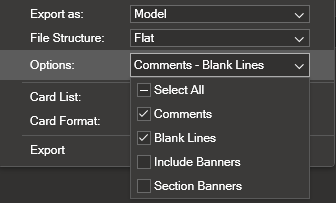
Comments: keeps
$comment lines.Blank Lines: keeps empty lines.
Include Banners: marks where each
INCLUDEwas expanded.Section Banners: adds a header at the start of each section.
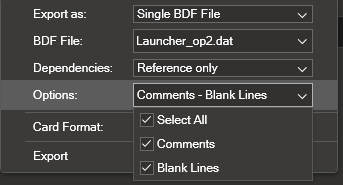
Preserve Includes and Single BDF File offer only the first two, because their output keeps the original files and there is no expansion to mark:
Card List — which cards are exported. This is where the two routes differ.
From the Card Manager, the list is the deck you have loaded:
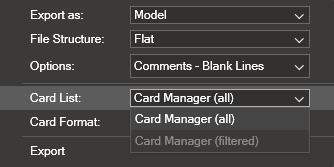
Card Manager (all): every row currently loaded in the manager.
Card Manager (filtered): only the rows passing the active column filters. It is greyed out while no column filter is applied, because it would match the same cards as all.
From the general route, the list is the model:
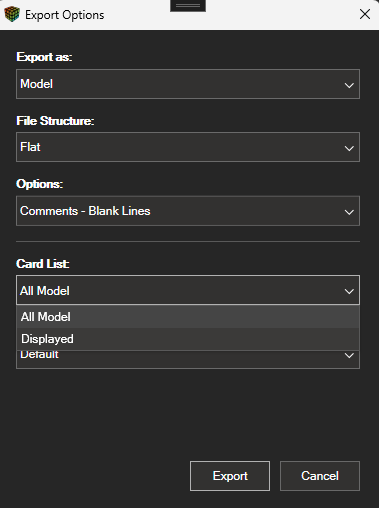
All Model: every Bulk Data card of the model.
Displayed: only what is visible in the 3D view, together with everything it depends on and everything applied to it — the same mini-model the Card Manager builds for its Displayed entry — so that the result is a deck that can be run again.
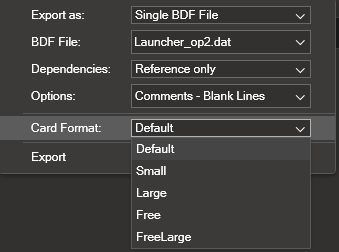
Card Format — field format of the written cards.
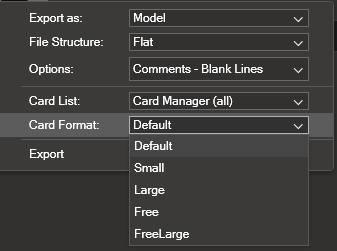
Default: keeps each card’s original format (recommended).
Small / Large: fixed-width fields, 8 / 16 columns.
Free / FreeLarge: comma-separated fields, short / long.
19.10.3. The Six Panels#
The same three modes, on each route. Comparing the two columns shows what each route adds.
From the Card Manager
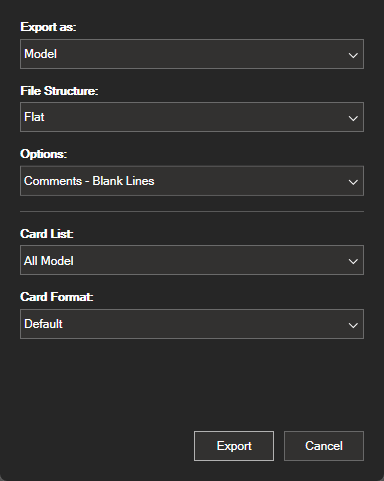
Model — with the file structure and the content options:
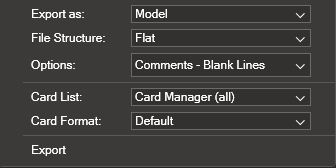
Individual Cards — no file structure and no content options: a raw dump has no model context to lay out or to annotate.
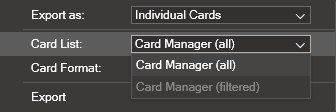
Single BDF File — the file to export and what to do with its INCLUDE directives, in place
of the card list:
From File → Export → Input File
Model:
Individual Cards — the only panel with Card Types:
Single BDF File:
19.10.4. Export Process#
Configure the options.
Click Export.
Choose the destination folder. The browser is the one Windows provides, so its button labels follow the language of the system; create a new folder there if you want to export into an empty one.
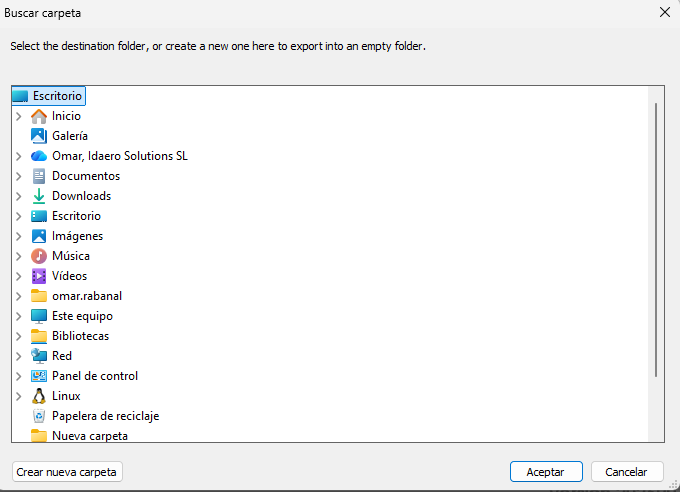
NaxToView checks that the destination is short enough for the files it is about to write. Windows limits a path to 260 characters, and the export refuses a folder that leaves no room under it, rather than letting the write fail halfway with a system error. Preserve Includes is the mode that needs the most room, because it reproduces the folder structure of the model inside the destination. If the folder is too deep, pick one closer to the root of the drive.
If the folder already contains files, NaxToView says so and asks whether to continue: files with the same name are overwritten.
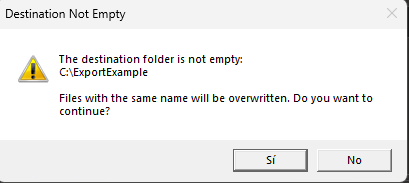
The files are written inside the folder you chose.
How many files you get
The export always writes into the folder you pick, and how many files land there depends on the mode:
Export as |
File Structure / Dependencies |
Result |
|---|---|---|
Model |
Flat |
One file, with every |
Model |
Preserve Includes |
The original tree of files, folders included |
Individual Cards |
— |
One raw |
Single BDF File |
Reference only |
Just that file, with its |
Single BDF File |
Inline (flat) |
One file, with its |
Single BDF File |
Separate files (hierarchical) |
That file plus the ones it includes, in their folders |
When there is nothing to export
If the options you chose resolve to no cards at all, the export stops before writing anything and says Nothing to Export. Rather than listing every possible cause, the message names the one that fits the route and the card list you picked, because they are not equally likely:
From the Card Manager. The usual cause is a column filter that lets no row through, so the message points at the active filters and suggests clearing them or switching the Card List option.
From the general route, with Displayed. Nothing is visible in the 3D view. Show what you want to export, or set Card List to All Model.
From the general route, with All Model. The model holds no supported Bulk Data card at all — a rare case with a model loaded. The way to still get those entries out is Export as = Individual Cards with Card Types = Supported + unsupported.
This check exists so that an empty selection cannot produce a file with nothing but a header and still report success.
19.10.5. The Result#
When the export finishes, a dialog states the outcome. There are three, and the title and the icon tell them apart before you read a word.
Export completed, nothing to report. The dialog gives the destination and no more.
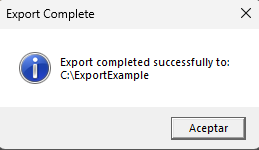
Export completed, with reader messages. Same title, but a warning icon, and the messages the reader left while writing — a card that could not be rebuilt, a file that could not be opened — listed under the destination. The files were written; the messages say what was not straightforward about them.
Export failed. Title Export Failed and an error icon. If the reader gave a reason, it is quoted; when it gave none, the dialog explains the usual cause — a model whose cards did not come from a NASTRAN or OptiStruct input file, so there are no input files to rebuild from — and states that nothing was written.
Whatever the outcome, the same report is also written to the Scripting panel, so it survives after the dialog is closed.
19.10.6. Repeating an Export from a Script#
Every export writes the equivalent scripting command to the Scripting panel, so an export configured once in the interface can be repeated without it:
Cards.Export(r"C:\output", mode="Model", structure="Flat",
             options=["Comments", "Blank Lines"], cards="All Model", format="Default")
The command carries every option that applied to that export, including those left at their default value, so it records exactly what was written and does not change meaning if a default changes in a future version. The options that the panel hid are not written either, which keeps the command the same shape as the panel that produced it.
When the export did not cover the whole model — a Card Manager holding only some categories —
the command adds only_types with the card types that were written:
Cards.Export(r"C:\output", mode="Model", structure="Flat",
             options=["Comments", "Blank Lines"], cards="All Model",
             only_types=["PBAR", "PROD", "PSHELL"], format="Default")
Two cases have no equivalent command: exports made from Card Manager (filtered), whose column filters cannot be expressed in a single call, and exports made from a Card Manager opened on a single BDF file. Both depend on the state of that window, so instead of writing a misleading command the panel explains it and points at the alternatives:
No script command was written: this export used a card set that cannot be expressed as a single call. Column filters and BDF-scoped decks depend on the state of this window. Export with “Card Manager (all)” over the whole model, or from File > Export > Input File, to get a reproducible command.
The call checks its arguments before writing anything and names the one at fault — an unknown
mode, a format that does not exist, a Single BDF File export with no file named. One of those
checks is worth knowing in advance: only_types is rejected in Single BDF File mode, because
that mode exports the whole file and not a selection of cards.
Tip
To share a single self-contained file → Export as = Model, File Structure = Flat.
To preserve the modular architecture → File Structure = Preserve Includes.
To hand over only the cards you edited → Export as = Individual Cards.
To include Bulk Data entries whose card type is not supported yet → the general route, Individual Cards, Card Types = Supported + unsupported.