
NaxToPy User Guide#
Table Of Contents#
1. Introduction#
NaxToPy is a Python package developed by Idaero Solutions. It is designed for extracting and processing the results data from binary output files of the main FEM solvers as well as FEM text input files.
The solvers output files that NaxToPy currently support are:
Nastran: .op2, .xdb, .h5
OptiStruct: .op2, .h3d
Abaqus: .odb
Ansys: .rst, .rth (beta)
The solvers input files that NaxToPy currently support are:
Nastran: .bdf
OptiStruct: .fem
Abaqus: .inp
1.1 Basic Knowledge#
There user should already know the basics of Python and object-oriented programming:
Python: The basic concepts of Python: Flow control, loops, data types, functions, importing packages, etc.
OOP: The basic concepts of opp should be necessary to use NaxToPy. What is an object, a class, difference between methods and functions, attributes and properties, etc.
Hint
Although this knowledge is recommended, it is not essential, as the package is well structure and the API interface is easy to understand.
1.2 Instalation#
NaxToPy is only available for Windows x64, either Windows 10 or Windows 11. As NaxToPy is a Python package that uses libraries from the NaxTo software, the user must install Python and NaxTo before installing NaxToPy.
1.2.1 Installing Python#
To install Python for Windows x64, visit the official Python page and choose the Windows installer (64-bit). Choose the latest Stable Release sub-version of the three possibles versions that NaxToPy is compatible with: 3.9, 3.10, 3.11, 3.12 and 3.13. Execute the .exe file and follow the instructions.
1.2.2 Installing NaxTo#
To install NaxTo visit the Idaero web page or the Microsoft Store.
1.2.3 Installing NaxToPy#
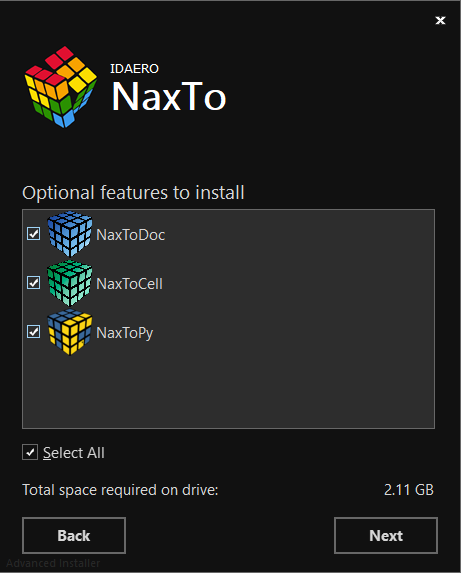
There is two ways to install NaxToPy. The first one is using the NaxTo Installer, where it is possible to select the option to install NaxToPy:
The second way is installing the package using the pip. The package is uploaded to the official Python repository, the PyPi. There, the installation information is written, as well as some important information related to the package. The command to install NaxToPy in a typical environment is:
>>> pip install NaxToPy
The following information should appear below the command. It indicates that the NaxToPy package and its dependencies have been installed.
Collecting NaxToPy
  Using cached NaxToPy-3.0.0-py3-none-any.whl.metadata (27 kB)
Collecting pythonnet>=3.0.3 (from NaxToPy)
  Downloading Pythonnet-3.0.5-py3-none-any.whl.metadata (6.6 kB)
Downloading NaxToPy-3.0.0-py3-none-any.whl (269 kB)
   ---------------------------------------- 269.4/269.4 kB 5.5 MB/s eta 0:00:00
Using cached numpy-1.26.2-cp311-cp311-win_amd64.whl (15.8 MB)
Downloading Pythonnet-3.0.5-py3-none-any.whl (290 kB)
   ---------------------------------------- 291.0/291.0 kB 4.5 MB/s eta 0:00:00
Downloading clr_loader-0.2.7-py3-none-any.whl (51 kB)
   ---------------------------------------- 51.3/51.3 kB 2.6 MB/s eta 0:00:00
Downloading cffi-1.17.1-cp311-cp311-win_amd64.whl (181 kB)
   ---------------------------------------- 181.5/181.5 kB 10.7 MB/s eta 0:00:00
Installing collected packages: pycparser, numpy, cffi, clr-loader, pythonnet, NaxToPy
Successfully installed NaxToPy-1.2.0 cffi-1.17.1 clr-loader-0.2.6 numpy-1.26.2 pycparser-2.22 Pythonnet-3.0.5
1.3 Quick Start#
The first line that must be written is the import command. This command allows the user to know if the package is successfully installed. Using the Python console:
import NaxToPy as n2p
If no error has appeared, the package has been installed and now is possible to use all its functionality. Before loading the first model, let’s check the package version:
print(n2p.VERSION)
Now, it’s time to load our first model:
path = r"C\test_models\mymodel.op2"
model = n2p.load_model(path)
Warning
The NaxToPy version requires a specific NaxTo version. If NaxToPy detects the NaxTo version installed is not compatible an error or a warning will appear:
C110: THIS VERSION OF NAXTOPY(3.0.0) IS NOT COMPATIBLE WITH THE NAXTO VERSIONS THAT ARE INSTALLED.
    UPDATE TO A COMPATIBLE NAXTO VERSION (2025R0) OR DOWNLOAD FROM https://pypi.org/project/NaxToPy/ A COMPATIBLE NAXTOPY VERSION
To check compatibility go to the PyPi and check the “⚠️Warning”. If an older version of NaxTo is installed, an older version of NaxToPy can be downloaded from the Version History.
2. Loading a Model#
The function load_model() is used to generate a N2PModelContent. It has required argument, the path of the file, and two optional: the type of file and if parallel computing is active.
This function can be used for loading a mesh file from Nastran, that is a plain text file, or a complete model from a binary file such an op2, h3d, h5, etc. (Internally it will check the solver). The function has the optional argument file_type. This argument is None by default, so the function checks the type. The other two options are "Binary" or "InputFileNastran".
If the file is a "Binary" file, the function use parallel computing. If sequential load is required, set the argument parallelprocessing to False.
model1 = N2P.load_model(ruta1)
model2 = N2P.load_model(ruta2, parallelprocessing=True, file_type="Binary")
model3 = N2P.load_model(ruta3, parallelprocessing=False, file_type="InputFileNastran")
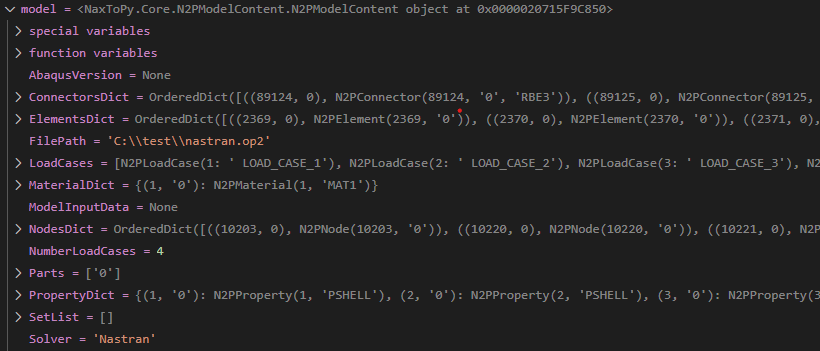
An instance of a N2PModelContent has been loaded in the variable “model”. There is kept all the mesh and results structure of the file:

Note
The user can see more information by positioning the mouse over the methods or the classes in IDEs such as PyCharm or VSCode.
3. The Mesh#
The mesh is loaded during the load_model() function. It loads elements, nodes, coordinate systems and connectors . The properties and materials are only loaded when they are required by the user. All this data has a class associated. For example, an element is stored as a N2PElement. In most cases the data associated to solver information is keep as a reference to the object. An exception could be the property associated to an element, that it is an integer or a string instead of a reference.
3.1. Basic Functionality#
For mesh, several sentences can be executed in the same line. Nevertheless, it is highly recommended to save the result of each sentence in a variable and in the following line call the next one for novels users. These actions help to keep tracking of the code flow as in the debug mode the user can see what methods and properties are associated to each variable they are getting.
There are two ways to access the data of the mesh. First, as properties of the model (instance of N2PModelContent). Secondly, using methods of the model. The last one has the advantage of being easier to work with. In this first example, using the property, all the elements of the model are kept in the variable “elements” in a dictionary, where the key is a tuple with the ID of an element and the ID of the part and the value is an N2PElement. In the next line, using the method, the elements are kept as a list.
elements = model.ElementsDict
elements = model.get_elements()
In the second example, some elements are kept. The property Elements is a dictionary, so it is needed to use the key of the N2PElement. In the second line, the method searches for us the elements only with the ID, as it is not needed to specify the part if there is only one (or no superelements have been defined). Both lines keep in “some_elements” the same four N2PElement.
some_elements = [model.ElementsDict[key] for key in [(1, 0), (2, 0), (3, 0), (4, 0)]]
some_elements = model.get_elements([1, 2, 3, 4])
a_element = model.get_elements(5)
Take into account that the argument for these methods must be an integer, a tuple, a list of integers or a list of tuples. The other components of the mesh can be searched in the same way. In the following example, four N2PNode are kept in “some_nodes”, a N2PCoord is kept in “a_coord” and three N2PConnector are kept in “some_connector”.
some_nodes = model.get_nodes([1000, 1001, 1002, 1003])
a_coord = model.get_coords(2000)
some_connector = model.get_connectors([3000, 3001, 3002])
Materials and model properties work similar to other data. There are two dictionaries where the instances of the objects that inherit from the classes N2PMaterial and N2PProperty can be searched.
matdict = model.MaterialDict
propdict = model.PropertyDict
The materials and properties do have PART ID:
a_material = matdict[(60, "0")]
There are also built in methods to check for material and properties.
some_material = model.get_material([60, 70, 80])
some_property = model.get_property([(101, "0"), (101, "1"), (101, "2")])
3.2 Accessing the Data#
The instances of N2PElement, N2PNode, N2PConnector, N2PCoord, N2PMaterial and N2PProperty have lot information that can be accessed by theirs attributes. For example, for a N2PElement it is possible to check the nodes that makes the element:
element = model.get_element(1000)
nodes = element.Nodes  # (N2PNode(1000, "0"), N2PNode(1001, "0"), N2PNode(1002, "0"), N2PNode(1003, "0"))
Another example is that from a N2PNode is possible to check the elements that is connected to:
a_node = nodes[0]  # From the previous code
a_node.Connectivity  # [N2PElement(1000, "0"), N2PElement(1003, "0"), N2PElement(1005, "0"), N2PElement(1009, "0")]
Hint
Check the NaxToPy API Reference for more information. Look in the search box for an specific class to know what information is stored.
3.3 Advanced Methods#
There are five methods in N2PModelContent that allow the user to obtain elements that accomplish certain characteristics based on a previous element (or connector). These functions are: get_elements_by_face, get_free_edges, get_elements_adjacent, get_elements_attached and get_elements_filtered:
get_elements_by_face returns the list of N2PElement that are in the same plane as the N2PElement that are used as arguments. It has a tolerance that can be modified using an optional argument. Also, the domain of elements where the method look can be passed as an optional argument.
elemface = model.get_elements_by_face(an_element, domain=some_elements, tolerance_angle=15)
get_free_edges returns a list of tuples of N2PElement and two N2PNode of that element. The two nodes define the edge of the element that is contained in the free edge of the mesh, the tuple will only be searched in that domain. Notice that connectors, although they may be given in the domain, they are never included in the free edges.
elemedge = model.get_free_edges(an_element)
get_elements_adjacent returns a list of N2PElement and N2PConnector that are adjacent to selected ones. If a domain is selected, the adjacent elements only will be searched in that domain.
elemadjacent = model.get_elements_adjacent(an_element, domain=some_elements)
get_elements_attached returns a list of N2PElement and N2PConnector that are attached to selected ones. If a domain is selected, the attached elements only will be searched in that domain.
elemattached = model.get_elements_attached(an_element, domain=some_elements)
get_elements_filtered returns a list of N2PElement according to the filtered options marked. The elements can be filtered by property, material, part and/or type of element. If two or more filters are selected (for example, material and type) the intersection of both sets will be returned.
# A list of elements that have a property with a material id equal to 60 OR 70
elem_filtered1 = model.get_elements_filtered(materials=[60, 70])

# A list of elements that have a property with a material id equal to 60 and AND CQUAD4
elem_filtered2 = model.get_elements_filtered(materials=[60], elementType=["CQUAD4"])

# A list of elements that have a property ID equal to 101 AND part equal to "0"
elem_filtered3 = model.get_elements_filtered(properties=[101], parts=["0"])
3.4 Model Input Data#
When the model is loaded from a Nastran Input File (.bdf or .dat), an Optistruct Input File (.fem) or an Abaqus Input File (.inp), the property ModelInputData is a N2PNastranInputData object for Nastran and Optistruct or a N2PAbaqusInputData, that contains all the information of the text file and its includes. By default ModelInputData is None.
N2PNastranInputData#
The information read from a .bdf or .fem file is usually saved as a N2PCard, that inherits from N2PInputData.
These N2PCard objects can be accessed using the method of N2PNastranInputData get_cards_by_field(). This method has a required argument, the list of the string that want to be searched. The word is searched by the default in the position (0, 0) of the Nastran CARD. It can be changed using the optional arguments row and col.
model = n2p.load_model(r"C:\input_nastran.bdf", file_type="InputFileNastran")
cfast = model.ModelInputData.get_cards_by_field(["CFAST"])
property_100020 = model.ModelInputData.get_cards_by_field(["100020"], row=2, col=0)
The data of the objects can be modified and then the .bdf files with the same structure can be written with those changes using the method rebuild_file().
cfast: n2p.AllClasses.N2PNastranInputData.PBUSHNAS = model.ModelInputData.get_cards_by_field(["PBUSH"])[0]
cfast.K1 = 100_000
cfast.K2 = 10_000
cfast.K3 = 10_000
model.ModelInputData.rebuild_file(r"C\NaxToPy\RebuildedFolder")
N2PAbaqusInputData#
The information read from a .inp file is saved as N2PKeywords and N2PEntity. To check for this data there are two main methods:
get_keywords_by_type: returns the list of N2PKeywords of the type requested.
model = n2p.load_model(r"C:\input_abaqus.inp", file_type="InputFileAbaqus")
element_keyword = model.ModelInputData.get_keywords_by_type(field="ELEMENT")
Note
The type of keywords are:
"BEAMSECTION", "DENSITY", "COUPLING", "DISTRIBUTING", "DISTRIBUTINGCOUPLING", "ELASTIC", "ELEMENT", "ELSET", "ENDINSTANCE", "ENDPART", "INSTANCE", "KINEMATIC",
"KINEMATICCOUPLING", "MATERIAL", "NODE", "NSET", "ORIENTATION", "PART", "PLASTIC", "SHELLSECTION", "SOLIDSECTION", "SURFACE", "UNSUPPORTED".
get_entity_by_key_and_id: returns the N2PEntity asked. It cane be an "ELEMENT" or a "NODE". In NaxToPy a entity is the node or element defined inside the keyword *ELEMENT or *NODE.
node_3 = model.ModelInputData.get_entity_by_key_and_id("NODE", 3)
Warning
The Abaqus Input Reader functionality is still in develop phase, so it may be not as stable as other NaxToPy functionalities.
4. Results Structure#
4.1. Accessing the Data#
As well as the mesh, the result structure is loaded during the load_model() function. The model has a list of the load cases. Each load case has a list of increments and a dictionary of results. Each result has dictionary of components and a dictionary of derived components. Lastly, each component has a list of sections.
To search for a load case, there are two ways like in the mesh: using a property or a method. The property returns the list of load cases as N2PLoadCase. The method returns the N2PLoadCase asked in the argument. This argument can be an int for searching by id or a string for searching by name:
loadcases = model.LoadCases
loadcase1 = model.get_load_case(1)
a_loadcse = model.get_load_case("STATIC-01-A")
And also get_load_case() can admit a list of int or str:
some_loadcse = model.get_load_case([1, 2, 3, 4])
The N2PLoadCase has a dictionary of results which are N2PResult class. Its search is done in the same way:
resultsdict = a_loadcse.Results
displacement = a_loadcse.get_result("DISPLACEMENTS")
The n2ploacase has a list of increments/frames as N2PIncrement:
increment1 = a_loadcse.get_increments(1)
an_increment = a_loadcse.get_increments("t1=0.239283")
increments = a_loadcse.Increments
The N2PLoadCase has ActiveN2PIncrement as a property. This is the increment/frame where the results array will look for. To change this property, there are two options: change the property or use a method.
a_loadcse.ActiveN2PIncrement.ID
a_loadcse.set_increment(1)
The method has the advantage that returns a N2PLoadCase after updating the property, so it can be chained with the result method:
displacement = a_loadcse.set_increment(1).get_result("DISPLACEMENTS")
The N2PResult has a dictionary of components. To ask for them the same two ways:
componentsdict = displacement.Components
x = displacement.get_component("X")
Finally, the N2PComponent has N2PSection. They can only be search using the property as there is no method. The section is only to check the sections of the result, so later, when calling the method to obtain the results array, it can be used as an argument of the function.
sections = x.Sections
The class N2PComponent have methods that generate the result array. These methods are get_result_list() and get_result_ndarray().
Tip
In section 5.4 the method get_result_by_LCs_Incr() of the class N2PModelContent is explained and is the most powerful method to ask for results.
4.2. Importing Load Cases#
Sometimes, the load cases for a model are saved in different files. In those scenarios it is possible to load mesh and result from a file and then only the results from the others. It is also possible to load the mesh from an Input File (.bdf, .fem, .inp) and the results from the binary. This can be achieved using the method of the N2PModelContent class called import_results_from_files().
# Load mesh and results from loadcase1.op2
model1 = load_model(r"C:\models\loadcase1.op2")
# Load only results from loadcase2.op2 and loadcase2.op2
model1.import_results_from_files([r"C:\models\loadcase2.op2", r"C:\models\loadcase3.op2"])
# Load only the mesh
model2 = load_model(r"C:\models\mesh.fem")
# Load only results from loadcaseA.h3d and loadcaseB.h3d
model2.import_results_from_files([r"C:\models\loadcaseA.h3d", r"C:\models\loadcaseB.h3d"])
4.3. Create Derived Load Cases#
In NaxToPy is possible to create derived load cases, that it will be saved as an N2PLoadCase. Then, this load case works as any other load case. The derived load case is created using the method of N2PModelContent class: new_derived_loadcase(). This method returns a N2PLoadCase but also update the list of load cases of the model. The new load case is saved with a negative ID starting at -1. The method has two arguments: the name and the formula that generates the new load case.
In the next example a new derived load case is generated. It is a combination of the load case with ID=1, increment ID=1 and the load case with ID=2, increment ID=10. The first load case could be the mechanical and the second the thermal case.
new_lc = model.new_derived_loadcase("Derived-LC-1", "1.5*<LC1:FR1>+0.5*<LC2:FR10>")
The derived load case can also be loaded with the method get_load_case():
new_lc = model.get_load_case(-1)
4.4 Create a Load Case as envelope#
Using a similar method, a new N2PLoadCase can be created using the method of N2PModelContent, new_envelope_loadcase(). In this case, the load case it will be the envelope of the load cases that are pass as a formula:
envlp_lc = model.new_envelope_loadcase("Envelope-1-2-3", "<LC1:FR1>,<LC2:FR1>,<LC3:FR1>")
The envelope load case can also be loaded with the method get_load_case():
new_lc = model.get_load_case(-2) # As -1 is the derived load case
Tip
When working with lot of load cases, the formula can be writen with the python standard method join() and a generator. In the following example the formula is created for all the load cases in the model.
formula = ",".join(f"<LC{lc.ID}:FR{lc.ActiveN2PIncrement.ID}>" for lc in model.LoadCases)
envlp_all = model.new_envelope_loadcase("envelope", formula)
5. Result Array#
There are three ways to ask for the array result. These aproches are:
Basic Call: Calling
get_result_ndarray()in theN2Component.Report Call: Using the method
new_report()ofN2PModelContent.Advanced Call: Using the method
get_result_by_LCs_Incr()ofN2PModelContent.
Before taking a deeper look in this methods, let see the optional arguments that all three admit.
5.1 Arguments for Result Array#
These arguments are optional as there are some default values, but they are essential to know as they allow the engineer to obtain the results they actually require.
Argument |
Type |
Description |
|---|---|---|
sections |
|
Sections where the results will be loaded. All sections are selected by default |
aveSections |
|
Operation Among Sections. -1: maximum(default), -2: minimum, -3: average, -4: extreme, -6: difference |
cornerData |
|
|
aveNodes |
|
Operation among nodes when cornerData is selected. 0: None, -1: maximum(default), -2: minimum, -3: average, -5: Average with variation parameter, -6: difference |
variation |
|
Integer between 0 & 100 to select. 0: No average between nodes, 100: Total average between nodes (Default). |
realPolar |
|
Data type when complex result. 1: real/imaginary, 2: magnitude/phase |
coordsys |
|
Coordinate System where the result_array will be represented. 0: global, -1: Material Coordinate System, -10: user defined, -20: user system table >0: Solver ID of the Predefined Coordinate System. |
v1, v2 |
|
Directions vectors that generate the coordinate system axis: |
filter_list |
|
N2PElement or N2PNode where the results are asked |
Warning
The argument filter_list may slowdown the method. Therefore, it is better ask the results for all the elements and the filter your self the elements:
lc = 1
fx = model.get_result_by_LCs_Incr(...)
elements1 = model.get_elements([1000, 1001])
elements2 = model.get_elements([2000, 2001])

results1 = {ele.ID: fx[lc][ele.InternalID] for ele in elements1}
results2 = {ele.ID: fx[lc][ele.InternalID] for ele in elements2}
5.2 Basic call#
The basic call is used with the methods get_results_list() and get_result_ndarray(). The only difference between them is that the first one returns a tuple[list, str] and the second a tuple[ndarray, str]. The list or de numpy array contains the result asked, for example the value of von mises for ecah element. And they are oredered acording to the internal id of the element, node or element-nodal. The second position of the tuple is a string that specify where the results are placed and may be in elements, nodes or element-nodal.
x = model.get_load_case(1).get_result("DISPLACEMENT").get_component("X")
results = x.get_result_array()  # [[2.3, 6.2, 1.8, -3.4], "NODES"]

node1 = model.get_nodes(1)
node1_x = results[node1.InternalID]
von_mises = model.get_load_case(1).get_result("STRESSES").get_component("VON_MISES")
results = von_mises.get_result_array(coordsys=10)  # [[1.3, 23.2, -1.2, -1.4], "ELEMENTS"]

element3 = model.get_elements(3)
element3_von_mises = results[element3.InternalID]
xx_corner = model.get_load_case(1).get_result("STRAINS").get_component("XX")
results = xx_corner.get_result_array(cornerData=True)  # [[-11.3, 2.2, 1.6, 6.3], ""ELEMENT NODAL""]

element_nodal_2 = elementnodal()[2]
element_nodal_2_xx_corner = results[2]
5.3. Report Call#
The new_report() is a method of N2PModelContent that generates a N2PReport objects. This class is used to ask for lot of components, load cases and increments of a certain result.
report1 = model.new_report(
    "<LC1:FR1>,<LC2:FR1>",
    False,
    "STRESSES",
    "<VON_MISES:Z1#Z2#>,<MAX_SHEAR:Z1#Z2#>",
    False,
    element_list,
    "LC"
)
This method allows any of the optional arguments explained in Section 5.1:
report1 = model.new_report(
    "<LC1:FR1>,<LC2:FR1>",
    False,
    "STRESSES",
    "<VON_MISES:Z1#Z2#>,<MAX_SHEAR:Z1#Z2#>",
    False,
    element_list,
    "LC",
    sections=["Z1","Z2"],
    aveSections=-3,
    coordsys=3
)
After instance a new N2PReport, the method calculate() must be called and the results array will be stored inside the class as ndarray.
report1.calculate()
Then, it can be easily be written in a csv file using the method to_csv().
report1.to_csv(path=r"C:\example\report1.csv")
The user can access to the results after calling the method calculate() without writing a csv. Use the properties Body and Headers.
Note
Both properties, Body and Headers, return a ndarray of dtype equal to str. This means that if the user wants to post proccess the data, it must convert the items inside the Body to floats to work with the as numbers. For that reason and others, it is usually better to use the method get_result_by_LCs_Incr() explained in the next section.
5.4 Advanced Call#
The method get_result_by_LCs_Incr() is the most powerfull as it can return several load cases of several components of one result at the same time using paralell process. It also use eficiently the resources as it makes blocks of load cases taken into ocout the physical memory (RAM) of the machine.
The method is overloaded, so the user can introduce one component as a string or several components as a list of strings. In the first case the method returns a dictionary which keys are a tuple with the load case and the increment. In the second case, it returns a dictionary which keys are a tuple with the load case, the increment and the component.
model = n2p.load_model(r"C:\models\abaqus_model.odb")
# Ask for 4 load cases at the same time
results = model.get_result_by_LCs_Incr(
    [(1, 1), (2, 1), (3, 1), (4, 1)],
    "U",
    "U1",
)
# results = {
#            (1, 1): ndarray,
#            (2, 1): ndarray,
#            (3, 1): ndarray,
#            (4, 1): ndarray,
#           }
model = n2p.load_model(r"C:\models\abaqus_model.odb")
# Ask for 4 load cases and 3 components at the same time
results = model.get_result_by_LCs_Incr(
    [(1, 1), (2, 1), (3, 1), (4, 1)],
    "U",
    ["U1", "U2", "U3"],
)
# results = {
#            (1, 1, "U1"): ndarray,
#            (2, 1, "U1"): ndarray,
#            (3, 1, "U1"): ndarray,
#            (4, 1, "U1"): ndarray,
#            (1, 1, "U2"): ndarray,
#            (2, 1, "U2"): ndarray,
#            (3, 1, "U2"): ndarray,
#            (4, 1, "U2"): ndarray,
#            (1, 1, "U3"): ndarray,
#            (2, 1, "U3"): ndarray,
#            (3, 1, "U3"): ndarray,
#            (4, 1, "U3"): ndarray,
#           }
6. Useful Functinality#
In this chapter there are explained some classes and methods really useful that required special attention.
6.1 Logging in NaxToPy#
N2PLog is a class that controls the output log file and the console warnings and errors. It is based in the logging package. While NaxToPy is being executed, the most important information, warning and errors are saved in the file .log, that is placed in the same directory where the script is placed. The name of the files is “NaxToPy_{date}.log”, where the {date} is the day-month-year.
The information given has four parts: the time, the level, the id and the message. An example may be:
10:48:01 INFO I109: The library VizzerClasses.dll was load successfully.
This file is useful for informing the user if there has been an error during execution. For example, if the element with ID=2 doesn’t exist, it will be written in this file:
16:32:57 ERROR E202: ELEMENT 2 NOT FOUND.
There are several options that can be adjusted by the user: name of the file, level of the console info ("WARNING" by default), level of the file info ("INFO" by default), directory of the .log file, deactivate and active the file generation.
The user can generate its own log information using the N2PLog class. First the level of the information is selected, then the method user() is called. As argument it must be written the id of the message, that should start with D for debug info, I for neutral info, W for warning info, E for errors and C for critical errors. Then a 4-digit number should be written. After two points, add the message of the information:
import NaxToPy

NaxToPy.N2PLog.Warning.user("W1001: The RF is below 1")
NaxToPy.N2PLog.Critical.user("C1102: UNEXPECTED ERROR WHILE POSTPROCESSING THE DATA")
The user can create its own class to group the errors of its code:
from NaxToPy import N2PLog

class Error:
   """User class to group the errors of the user script"""

    E1000 = "E1000: The list is not a list of nodes"
    E1001 = "E1001: The list is not a list of elements"
    E1002 = "E1002: The list is not a list of connectors"

N2PLog.Error.user(Error.E1000)
6.2 Free Bodies#
To generate an calculate a free body of a section, a method of the N2PModelContent class must be used. Using the method create_free_body(), the user can create a free body attached to the model. It creates and return a N2PFreeBody object. During the instance of the object, the resultant of forces and moments are calculated. Example:
# Preparation of the arguments
lc = model.get_load_case(5)
incr = lc.ActiveN2PIncrement
node_list = model.get_nodes([1000, 1001, 1002, 1003, 1004, 1005])
elem_list = model.get_elements([1000, 1001, 1002, 1003, 1004])

# Builds and calculate the free body
fb1 = model1.create_free_body("freebody-1", lc, incr, node_list, elem_list)

# Forces and moments request
f_vector = fb1.Force
m_vector = fb1.Moment
Warning
The free bodies can only be calculated when the result file have the GPForces result. Working with Nastran or Optistruct, the launcher must have the Case Control Command GPFORCE as output selection. In Abaqus, the command required is NFORC for the output selection (*Element Output).
6.3 Executables with NaxToPy#
Module that creates an .exe file. It is used by the function n2ptoexe(). It has one mandatory argument, the path to the file that is intended to transform from a .py to a .exe. There are also some optional arguments that the user can use to add extra libraries, use or not a console window, etc…
Note
This method must be called from a different script than the one intended to be transformed into an executable.
# my_script.py

import NaxToPy as n2p

model = n2p.load_model(r"C:\models\model1.xdb")

print(f"The load cases in the model are: {model.LoadCases}")
# executable_creator.py

import NaxToPy as n2p

n2p.n2ptoexe(r"C:\scripts\my_script.py", console=True, solver="NASTRAN")
Warning
n2ptoexe() uses the external package PyInstaller. The function will search for it and if it is not found, it will try to install it. If it fails, the user must install it manually.

All rights reserved. This document is licensed under the terms of the LICENSE of the NaxToPy package.